SEARCH RESULTS
67 results found with an empty search
- The Best Ceramic Coating, For You!
Welcome to the Ceramic Coat Experts' guide to the best Ceramic Coating 2024. We at Ceramic Coat Expert pride ourselves on having an unbiased review plan for all ceramic coating products out there. We do not take sponsorship deals for that reason alone. If the product we test performs well, it will get a good review, and if it performs poorly, the following review will reflect that poor performance. No favoritism, and no second chances, only real-world results! When you purchase products through our independent recommendations, we may earn an affiliate commission. Contents: Buying Guide for the Best Ceramic Coating Products Choosing an Expert Ceramic Coating Best Ceramic Coatings 2024 - Ceramic Coat Expert's Top Picks FAQ Best Ceramic Coatings - Final Thoughts As impressive as ceramic coatings appear, ceramic coatings for automobiles have limitations, and precise application is required for protection that lasts as long as the package claims. The gleam and shiny clearcoat of a new car will never last forever, but a ceramic coating might make it appear that way. These ceramic coating formulae are praised for their ability to keep vehicles looking glossy and mirror-like while also repelling rain, dust, muck, and UV rays, among other things. Here's everything you need to know about professional ceramic coatings and do-it-yourself ceramic coating projects. Buying Guide for the Best Ceramic Coating Products Ceramic coatings are available in a variety of configurations, including sprays, sets, and droppers. There are several ceramic coatings available for various types of vehicles to enhance traditional waxes and car coatings. Some are hybrids, including ceramic wax blends and ceramic graphene sprays. If you're not familiar with ceramic coatings, it's advisable to contact a ceramic coating business or chat with a detailer about getting ceramic coating installation done. Choosing an Expert Ceramic Coating A high-quality ceramic coating acts as a protective layer on a vehicle, preventing corrosion and wear and tear caused by a variety of circumstances. While a professional ceramic coating is likely to be seen only in professional garages, other vehicle specialists and detailing fans would desire a quality ceramic coating solution to obtain that thin but long-lasting coating on cars. There are numerous options, and shoppers must consider several factors before selecting ceramic coatings, such as how long they want the coating to last, what type of paint they're applying it to, and what they want the ceramic coating to protect (a paint job, headlights, trim? ), and how much of an investment they're willing to make. Where Should Ceramic Coating Products Be Used? The most apparent area to put a ceramic coating is the paint job of a vehicle, but it is not the only one. A ceramic coating for cars can be applied to plastic trim, headlamps (which are usually plastic but can also be glass), and even glass windows to provide a showroom-quality shine all throughout. Always examine the directions for any specifics with any ceramic coatings. Prior to applying ceramic coatings, it is important to prepare the car's surface thoroughly wash the car and use a clay bar for long-lasting protection that goes on simply and uniformly, as well as to perform any paint correction required to the paintwork. This is because you want to 'preserve' the paint while it is in superb condition, plus proper surface prep helps the ceramic coatings bond with the surface. What Do Ceramic Coatings Prevent? A ceramic coating, when applied properly, protects the surface of an automobile, as well as other vehicles and boats, from water, acid rain, chemicals, bird droppings, salt, UV rays, corrosion, and minor chips or scratches. More impressively, ceramic coatings are designed to last a year or more (some even up to three years) while also providing a high-gloss surface. Where does ceramic coating layer of protection end? Ceramic coatings cannot protect vehicles against wayward boulders, door dings, and other severe damage. Serious swirl marks and scratches, on the other hand, require more than a ceramic layer to repair and typically necessitate sanding or the use of a dual-action polisher. Ceramic Coating Hardness Levels Contrary to popular belief, the hardness of ceramic coatings is determined using the Wolff-Wilborn Pencil Hardness Test, not the Mohs scale. Even yet, figures are often misconstrued. Some businesses may try to offer ceramic automobile coating bottles and sprays with a hardness rating of 10. This is understandably difficult, given that the scale only goes up to nine. Interestingly, many manufacturers offer pencil numbers up to 10H, so firms who boast this score aren't technically incorrect—but this pencil isn't any harder than a standard 9H pencil; hence, the 9H/10H in the name/description of some ceramic coatings. Furthermore, the scratch resistance of a ceramic coating for vehicles is not designed to be an indestructible covering that can withstand harsh surfaces smashing into it or severely harming its surface. It's a "sacrificial protective layer" that absorbs some damage, swirl marks, and scratches rather than the paint being the first line of defense (paint hardness is much softer than ceramic coatings, anyways). You can learn more about the hardness levels of Ceramic Coatings in this article. Best Ceramic Coatings 2024 - Ceramic Coat Expert's Top Picks Choose a premium, top-rated ceramic coating product from the list below. => Best Ceramic Coating rated my Ceramic Coat Expert: CarPro CQuartz UK 3.0 Ceramic Coating | Buy Now => Best Value Ceramic Coating: Weiruixin 10H Ceramic Coating | Buy Now => Best Long-Life Ceramic Car Coating: Gtechniq Crystal Serum Light (CSL) Ceramic Coating | Buy Now => Best Ceramic Coating Spray rated my Ceramic Coat Expert: System X Renew Ceramic Spray Coating | Buy Now => Best Value Ceramic Coating Spray: Mothers CMX Ceramic Spray Coating | Buy Now => Best Long-Life Ceramic Coating Spray: System X Renew Ceramic Spray Coating | Buy Now => Best Graphene Ceramic Coating: Adam's Advanced Graphene Ceramic Coating | Buy Now => Best Graphene Ceramic Coating Spray: 303 Graphene Nano Spray Coating | Buy Now => Best Ceramic Spray Wax: Meguiar's Hybrid Ceramic Wax | Buy Now => Best Ceramic Coating for Plastics: CERAKOTE Plastic Trim Coat Kit | Buy Now => Best Ceramic Coating for Leather: GYEON Leather Shield Ceramic Coating | Buy Now => Best Ceramic Coating for Wheels: GYEON Rim Ceramic Coating | Buy Now => Best Beginner Friendly Ceramic Coating Spray: Turtle Wax Hybrid Solutions Ceramic Spray Coating | Buy Now Scroll down to view our top recommendations for the best ceramic coatings based on customer feedback. *Prices in this article were displayed in US dollars on Amazon.com (USA) as of February 2024. 1. Best Ceramic Coating rated my Ceramic Coat Expert—CarPro CQuartz UK 3.0 Ceramic Coating We've been using this product for a long time and are well-versed in its intricacies. We utilize this product for our consumers because we want to provide them with the greatest quality we can stand behind. And the current version is CarPro CQuartz UK 3.0. If you're into Ceramic Coatings, you've probably heard of CarPro! We are not paid to say this, but we have opted to use this product since, when compared to other competitors, it just performed better in a way that works for us. Some of these items may outperform CarPro in some categories, but we believe this one is an all-around winner. Additionally, this Ceramic Coating promotes its 9H hardness level. CQ.UK 3.0 Ceramic Coating kit is one of the most effective Ceramic Coatings we've ever utilized. It comes highly recommended by us. Check the full product review here. Specifications: product life time when applied: A resistance to elements: A resistance to damage: B resistance to chemicals: A application difficulty: C hydrophobic properties: A gloss / shine: B Average grade: B Cost: 47.33$ / 1 fl oz 1.60$ / 1 ml BUY NOW on Amazon: CarPro CQuartz UK 3.0 Kit 2. Best Value Ceramic Coating—Weiruixin 10H Ceramic Coating Weiruixin 10H Ceramic Coating functioned more like a Spray-On Ceramic Coating but without the convenience of application or the enormous increase in product amount that sprays often provide. Overall, it wasn't bad, but if someone recommended this product to you while promising all of these things, you'd be a frustrated client with a distorted idea of what Ceramic Coatings are. This product did perform as one, but only mediocrely in all areas. Was the product diluted, or was it a diluted form of Ceramic Coating and had such a low price point as a result - we don't know, we aren't chemists, and we don't know their manufacturing method. In any case, we couldn't promote this product to our readers knowing that we couldn't stand by it. But again, if you want a cheap ceramic paint coating to test out perhaps or want some minimal protection and shine then Weiruixin 10H isn't a terrible option. Check the full product review here. Specifications: product life time when applied: C resistance to elements: C resistance to damage: D resistance to chemicals: C application difficulty: C hydrophobic properties: C gloss / shine: B Average grade: C Cost: 14.79$ / 1 fl oz 0.50$ / 1 ml BUY NOW on Amazon: Weiruixin 10H Ceramic Coating 3. Best Value Ceramic Coating—Gtechniq Crystal Serum Light (CSL) Ceramic Coating Gtechniq Crystal Serum Light Ceramic Coating has unquestionably shown to be an excellent protective coating product and has elevated Gtechniq as a brand in our view. With so many new items arriving from all over the world, it might be difficult to know which one to trust because they all claim to be the greatest, the most durable, the one with the longest lifespan, and so on. Gtechniq CSL Ceramic Coating has fared successfully owing to its own marketing. We wouldn't say it has a dramatic influence on the paint, especially boosting, deepening, or gloss. It did, however, have a discernible impact that lasted the entirety of the torture test. Great ceramic coating overall! Check the full product review here. Specifications: product life time when applied: A resistance to elements: A resistance to damage: B resistance to chemicals: A application difficulty: C hydrophobic properties: A gloss / shine: C Average grade: B Cost: 65.06$ / 1 fl oz 2.20$ / 1 ml BUY NOW on Amazon: Gtechniq Crystal Serum Light (CSL) Ceramic Coating 4. Best Value Ceramic Coating—System X Renew Ceramic Coating Spray It is truly a jewel among Ceramic Sprays, and we are surprised that it is not more widely recognized. We're glad we stumbled upon System X. It withstood every form of punishment we threw at it. While other ceramic coating sprays were washed away by rain, but most likely by using standard vehicle shampoo, this one lasted and lasted. As we tried to destroy it, it lost some of its gloss slickness and hydrophobic qualities. But it took a long time for it to lose its effectiveness. The only disadvantage we could find was that it is a little more difficult to apply. When buffing off the lotion, it does not buff off completely, leaving some haziness or streaks. However, you may resolve this issue by simply recoating the affected area and buffing it with a clean and dry microfiber towel. It's definitely worth your money. Check the full product review here. Specifications: product life time when applied: B resistance to elements: C resistance to damage: E resistance to chemicals: B application difficulty: B hydrophobic properties: B gloss / shine: B Average grade: B Cost: 3.49$ / 1 fl oz 0.12$ / 1 ml BUY NOW on Amazon: System X Renew Ceramic Coating Spray 5. Best Value Ceramic Coating Spray—Mothers CMX Ceramic Spray Coating There is a reason we began this piece with our experience with Mothers and our opinion of how most firms in the Automotive Detailing Industry function when it comes to releasing new products. We had previously tested this product at the time this piece was published, but we also had a suspicion before we started the test. Unfortunately, this one proved to be correct. Is this some kind of ceramic spray coating? It's possible! We can't test it inside a lab since we're not scientists or chemists. When exposed to these pollutants, it acted more like a car wax or paint sealant, in our opinion. It would be a solid paint protection agent if you used a pH-neutral vehicle shampoo and avoided utilizing those automated car washing facilities. In some rating categories, it may even outperform a Polymer Sealant. Is it very inexpensive for the amount of product you get? Of course, yes. Would we suggest it? Not exactly. We just couldn't say, 'yeah, it's a great product' and stand by our words when our reputation was on the line. Check the full product review here. Specifications: product life time when applied: D resistance to elements: D resistance to damage: E resistance to chemicals: E application difficulty: A hydrophobic properties: C gloss / shine: D Average grade: D Cost: 0.58$ / 1 fl oz 0.02$ / 1 ml BUY NOW on Amazon: Mothers CMX Ceramic Spray Coating 6. Best Long-Life Ceramic Coating Spray—System X Renew Ceramic Spray Coating No, this is not a typo. System X is on this list more than once. The ceramic coating spray is simply THAT good, and we cannot think of a better candidate for this specific category. For a bit more detail, you can check our listing for Best Ceramic Coating Spray, rated my Ceramic Coat Expert up at number 4. System X offers a superb product, and if you are not going to opt for a traditional, or let us be specific - a true ceramic coating, then we suggest you go with this product. Check the full product review here. Specifications: product life time when applied: B resistance to elements: C resistance to damage: E resistance to chemicals: B application difficulty: B hydrophobic properties: B gloss / shine: B Average grade: B Cost: 3.49$ / 1 fl oz 0.12$ / 1 ml BUY NOW on Amazon: System X Renew Ceramic Spray Coating 7. Best Graphene Ceramic Coating—Adam's Advanced Graphene Ceramic Coating A list of best car coatings cannot go without at least 1 Adam's product. And what a product it is. They claim it is the best coating they have ever produced. And after testing, we have determined that that claim is quite true. This is one of the top coatings we've ever used. Considering all the ceramic and graphene coatings we've experimented with over the years, that is fantastic! Unquestionably, Adam's has produced something that we can suggest with ease. It is difficult to say if it will withstand the nine or more years it promises, but during testing, we gave it quite a beating, and it stood admirably after the dust had settled. It is a very durable coating, no question about it. A great recommendation! Check the full product review here. Specifications: product lifetime when applied: A+ resistance to elements: A resistance to damage: A resistance to chemicals: A application difficulty: C hydrophobic properties: B gloss / shine: A Average grade: A Cost: 56.52$ / 1 fl oz 1.88$ / 1 ml BUY NOW on Amazon: Adam's Advanced Graphene Ceramic Coating 8. Best Graphene Ceramic Coating Spray—303 Graphene Nano Spray Coating Simply said, this product blew us away. Surprise after surprise, and all in good fun! Even if you walked in entirely biased, you wouldn't be able to walk out without recognizing how excellent this ceramic spray coating is. 303 did a wonderful job there. And they should be commended for it. Was it the Graphene that made all the difference, or was it the Ceramic Coating recipe that was simply too good? It's difficult to say. If we had more scientific equipment to do more complex tests in those white lab coats, we could give you a clear answer. However, here we are. We were amazed by what we witnessed. If you're looking for a Ceramic Spray coating, go no further than 303 Graphene Nano Spray Coating. And it is, without a doubt, the greatest Ceramic Spray coating we have ever used. We might even go so far as to say that outperforms some of the typical consumer-grade ceramic coatings we've used in the shop in the past. It comes in a conventional 24 fl oz container and should keep you satisfied for the duration of the summer at a reasonable price. If you despise all of the tedious prep work and materials required to properly ceramic coat a car, we highly recommend purchasing this product and seeing where it leads you! Check the full product review here. Specifications: product life time when applied: C resistance to elements: C resistance to damage: E resistance to chemicals: C application difficulty: A hydrophobic properties: C gloss / shine: D Average grade: C Cost: 2.08$ / 1 fl oz 0.07$ / 1 ml BUY NOW on Amazon: 303 Graphene Nano Spray Coating 9. Best Ceramic Spray Wax—Meguiar's Hybrid Ceramic Wax Is this a ceramic coating product? No. At best, it functioned as a Car Wax or a Polymer Sealant. It had good hydrophobic capabilities until it was added to standard vehicle shampoo. It soon deteriorated, and once a stronger detergent was employed, it lost all of its hydrophobic qualities. For the money you pay, you get a great lot of product, a whopping 26 ounces! The disadvantage of this product is that it takes two applications when applied. We agree that only one would be enough because the second application, according to the mechanism utilized, is quite inefficient. For the second case, we would suggest a more traditional way. We would not provide a recommendation based on how well or poorly the product functioned, and we believe it is pricey, given how quickly and easily it fades. Its pricing is most likely due to the brand's name imprinted on it. Is it satisfactory? Not at all. But it's not terrible, either. If you have one of these, you may still apply it after each wash to add a little extra protection to the paint. The final grade speaks for itself, but it was also to be expected given that it is a spray-on form of Ceramic Coating or Ceramic Wax. Check the full product review here. Specifications: product life time when applied: D resistance to elements: D resistance to damage: F resistance to chemicals: E application difficulty: C hydrophobic properties: C gloss / shine: B Average grade: D Cost: 0.74$ / 1 fl oz 0.03$ / 1 ml BUY NOW on Amazon: Meguiar's Hybrid Ceramic Wax 10. Best Ceramic Coating for Plastics—CERAKOTE Plastic Trim Coat Kit If you have faded, aged, or worn-out-looking plastic, we promise that this product will restore them to its former appearance. Of course, it doesn't matter what kind of plastic you use. But since we're talking about vehicles, let's stick to that. Do not use the product on other sorts of materials, according to the directions; we haven't tested it on other materials so we don't know how it would function, but on plastic, it is the best product we know of for that purpose. It all boils down to this: do you need to fix your car's plastic trim? CERAKOTE Ceramic Trim Coat Kit - Quick Plastic Trim Restorer is available for purchase! Check the full product review here. Specifications: product life time when applied: A resistance to elements: A resistance to damage: B resistance to chemicals: A application difficulty: A hydrophobic properties: A gloss / shine: A Average grade: A Cost: 19.88$ / 1 vehicle kit BUY NOW on Amazon: CERAKOTE Plastic Trim Coat Kit 11. Best Ceramic Coating for Leather—GYEON Leather Shield Ceramic Coating Ah, GYEON... They've been around for about 10 years now, probably a bit more. GYEON originally started out as a car detailing company in South Korea. But, they are now a global powerhouse in the automotive detailing industry and have been for a very long time. If you are in car detailing, then you must've heard of GYEON and have likely used some of their products. We know we have. What we like about them the most is, and this is no joke - the packaging they use for their products. It is transparent, it is cool looking, and well, we love it. Their MOHS Ceramic Coating is top-notch, but. That product is not why we are here. Today we are presenting an amazing ceramic coating for the leather surfaces of your car. And out of all the leather ceramic coatings we've tried, this one took the top spot. If you have leather in your car, it doesn't matter if it is the seats, the door trim, the console, or even the steering wheel - you have to ask yourself the following question. "Do I want that nice-looking leather to look as nice after a decade?" If the answer is "No.", then we suggest you skip this product. But if, by any chance, the answer might be "Yes, yes please!", well... then we suggest you get yourself this product, apply it to all the leather trim of your car and reap the benefits. Check the article about ceramic coatings for leather here. BUY NOW on Amazon: GYEON Leather Shield Ceramic Coating 12. Best Ceramic Coating for Wheels—GYEON Rim Ceramic Coating GYEON, again! Well, they must be doing something right, other than providing pretty packaging for their products. Most people know that you can pretty much any quality ceramic coating on the wheels of your car. But, there is a reason why specialized ceramic coating for wheels was designed. Again, most people know that heat from heavy braking can leave ugly marks on the wheels. Also, brake dust is known for its difficulty when trying to remove it. Ceramic coating for wheels was designed to be a ceramic coating, but also to deal with those two pesky issues. If you want to avoid using aggressive chemicals to remove brake dust or you want to avoid getting scorch marks on your wheels, then we suggest you give this one a go and enjoy removing the difficult part in wheel maintenance while cleaning, and enjoy amazing-looking wheels for years to come! Check the article about ceramic coatings for wheels here. BUY NOW on Amazon: GYEON Rim Ceramic Coating 13. Best Beginner Friendly Ceramic Coating Spray—Turtle Wax Hybrid Solutions Ceramic Spray Coating To be honest, we were taken aback by this one. We've utilized turtle wax products in the past; some were fantastic, while others were less so. But this one, my goodness! This is a real find. And we wholeheartedly support this specific product. Given that spray Ceramic Coatings often perform poorly on all fronts except when it comes to application process difficulties, Turtle Wax Ceramic Spray Coating nailed it. We haven't evaluated all of their Hybrid Solutions goods, so we can't comment on them, but this one is - Amazing. It is affordable when you consider how many times you can use it for the price you spend. It is less expensive than some of the competition's ceramic spray coating products, which are inferior in our tests. So, in order not to irritate anyone, we will refrain from using names. This Spray-On Ceramic Coating is the best of all the ones we've tried. It will not function as well as a normal Ceramic Coating, but given how simple it is to apply, how little it costs, how long it takes to cover the entire car, and the fact that no prior training or expertise is required to work with it. "Just go for it!" is all that is left to say. If you want a more durable and long-lasting solution, read our evaluations or visit our top lists area to locate a regular Ceramic Coating that fulfills your needs and expectations, but if that is not the case, this is the one for you. Check the full product review here. Specifications: product life time when applied: C resistance to elements: E resistance to damage: E resistance to chemicals: C application difficulty: A hydrophobic properties: B gloss / shine: C Average grade: C Cost: 0.94$ / 1 fl oz 0.03$ / 1 ml BUY NOW on Amazon: Turtle Wax Hybrid Solutions Ceramic Spray Coating FAQ Which type of ceramic coating is best? The best type of ceramic coating depends on your specific needs and vehicle type. Traditional ceramic coatings, like CarPro CQuartz UK 3.0, offer long-lasting protection and gloss, while ceramic spray coatings, such as System X Renew Ceramic Spray Coating, provide easier application and good durability. What is the longest lasting spray ceramic coating? System X Renew Ceramic Spray Coating is highlighted for its exceptional longevity among spray coatings, offering a durable layer of protection that outperforms many competitors in its category. What ceramic coating lasts 5 years? No ceramic car coating products guarantee a 5-year lifespan (since maintenance plays a pivotal role in the longevity of ceramic coating). However, professional-grade coatings like Gtechniq Crystal Serum Light (CSL) and Adam's Advanced Graphene Ceramic Coating are known for their extended durability, with some products potentially reaching up to 5 years when properly maintained. What ceramic coating do professionals use? Professionals often use high-quality, long-lasting ceramic coatings such as CarPro CQuartz UK 3.0, Gtechniq Crystal Serum Light (CSL), and Adam's Advanced Graphene Ceramic Coating. These products are favored for their superior protection, durability, and finish, making them a popular choice among detailing enthusiasts and professional garages alike. Best Ceramic Coatings - Final Thoughts Ceramic automotive coatings can shield car paint against UV rays, stone chips, brake dust, acid rain, and other potentially harmful objects and factors. These ceramic coatings, which provide long-lasting protection, commonly contain silicon dioxide or titanium dioxide. Aside from the finest ceramic coating, proper maintenance is also essential to guarantee that these paint protection films and sacrificial layers function well (no car wash immediately after application or exposing it to poor weather). The appropriate tools are also necessary. It's a good idea to have lots of microfiber towels, micro silk applicators, and sponges on hand. We hope you found our study of the best ceramic coating for vehicles useful. We strive to test various brands of Ceramic Coatings for all applications and see how they perform in the real world. We want the reader to see how a product actually performs instead of relying on brand advertisements so that you, the reader, can find a ceramic coating that works best for your specific needs. Cheers!
- Leather Ceramic Coating - Can you Ceramic Coat Leather in a car?
Leather ceramic coating... If you know anything about ceramic coating or leather, then you know that those two don't look like a fit, at all. Well, we are here to tell you otherwise. Some people are into leather, and we won't go into much detail on that. Well, they found a way to utilize ceramic coating technology to be usable with leather. And, we must admit, the results are pretty impressive! When it comes to cars, you'll usually find leather wrapped around the seats. Sometimes, there is the dashboard, even doors. It all depends on the trim level you've paid for. But if you do have leather in your car - then it is almost always the seats. Contents: What is Ceramic Coating for Leather? Benefits of using ceramic coating on leather Effects of harsh weather conditions on leather and getting them clean How do you protect the leather in your car? When to apply the ceramic coating for leather? Applying ceramic coating on leather seats: 3 Steps 4 Advantages of ceramic coating your car's leather Ceramic Coating For Leather That We Recommend - GYEON Quartz LeatherShield FAQ Final Words — Leather Ceramic Coating Now, the leather looks amazing, it gives the car that luxurious feel, and it even feels nice. Of course, it all depends on whom you are asking. But many like-minded people love leather in their cars. And then, all of us, at one point, start hating it. Once it starts fading, cracking, and wearing down - there is nothing worse. At that point, it starts looking like a hobo car that no one would like to own. Even the value of the car depreciates simply because of the fact that the leather in the vehicle looks old and tired. It is, unfortunately, inevitable. The leather's durability will diminish over time, and at one point, you'll get into the car and notice your nightmare become a reality. And at that point, other than paying some pro hundreds of bucks to fix it up for you, there is really not much you can do about it except slow it down with expensive and time-consuming maintenance. But, fortunately, there is a way for that to never happen, at all - say hi to ceramic coating for leather! What is Ceramic Coating for Leather? Ceramic Coating is a chemical polymer solution that is applied to the exterior of a surface. This polymer solution creates a hydrophobic layer that protects the exterior of the surface applied. Exterior surfaces like the body of a car or car wheels are the popular surfaces to be ceramic coated. Ceramic coating is applied to protect the original paint job of a car or to protect the car wheels from wearing down due to UV radiation, and it gives it a slick finish that prevents dirt from sticking to it as easily. It also helps a lot with maintenance. When people look at your car from the outside, they admire the body of the car and the wheels of the car. But, when they look inside your car, it is the leather that is most likely to make an impression on them. So, let's say you've ceramic-coated your wheels and the body of your car. What can you do to make the seats look impressive? The answer to that is ceramic coating. Really? Can you ceramic coat leather in a car? Yes. Yes, you can! Benefits of using ceramic coating on leather We will just list the most obvious benefits, so you have a clear view of what the benefits are: very high durability that will last you anywhere from 1-2 years insane hydrophobic capabilities they'll help repel any dye transfer that you might have from your jeans built-in UV inhibitors the ultimate way to protect the leather in your car will leave the matte finish on the leather and will not change the color or the texture it will not stiffen up the leather or leave cracks once it cures and you sit on it very easy to apply Effects of harsh weather conditions on leather and getting them clean Cleaning the leather seats of your car can be a hassle. The weather is a significant influence, and when moisture gets underneath the covers in winter, it builds up and causes mildew on the leather seats. When you clean your leather seats, you can get rid of the specks of dirt and grime, but when it comes to mildew, it won't all go away. Mildew is one of the toughest stains to get rid of from car leather seats. The tiny spots caused by mildew can be very annoying. Sunny climates have problems of their own. UV radiation from the sun will damage the leather in your car. Also, high temperatures will dry up the seats, leaving them defenseless against cracking. Especially if the leather is black or some darker color. Darker colors do not reflect heat, as well as light colors, meaning the seats will be more prone to stay hot for longer. Unless you're taking care of such leather often, it is bound to be ruined at some point. Ceramic Coating is an amazing solution for those problems, as it deals with both, and will last you a long time. How do you protect the leather in your car? There are three known methods for protecting the leather seats of a car: Conditioning, Waxing, and Ceramic Coating. Conditioning protects against UV rays, cracks, and heat. Waxing also protects against UV rays and provides heat, and gives the leather water resistance. Ceramic coating provides everything the previous two and more. Ceramic coating is the most reliable when considering long-term protection. Ceramic coating makes maintenance easy and ensures minimal dust adhesion properties. There's an improvement in durability with ceramic coating, and the leather's aesthetic value is preserved. The leather seats won't absorb water because the hydrophobic layer from the ceramic coating will repel any liquid. Ceramic coating has a huge edge over waxing and conditioning. But the biggest is - durability and longevity. For proper waxing maintenance, you will wax your leather seats at least four times per year. To maintain conditioning, it is a routine of weekly application, which can be demanding and time-consuming. If you want to compare wax and ceramic coating directly and see how both perform across various categories then read this article we've written. Ceramic coating can last anywhere from one to about two years (depending on the product used, maintenance, outside elements, etc.) without getting damaged, which makes it much more durable than other protective coatings. Ceramic Coating for the Car Exterior will last anywhere from 2 to 5+ years. Ceramic Coating for Leather, however, will last you less. When to apply the ceramic coating for leather? Ceramic coating for leather will not restore any damage to the leather itself. Any type of damage will still be there and visible after application. That is why you want to install ceramic coating when the leather looks new. This way, you will preserve this new look for a long time. Much longer than what you'd normally get. You can apply a ceramic coating on damaged leather and ensure that the damage doesn't get worse. But if you want the leather to look fresh, we suggest restoring it first and then protecting it. Applying ceramic coating on leather seats: 3 Steps The application process starts with preparing the initial surface before properly adding the ceramic coating of your choice. We've used both GYEON LeatherShield and CARPRO Leather 2.0 in our shop. Both are very comparable and are good products. So whichever you choose from these two, you won't go wrong. We will talk about ceramic coating leather seats to keep it simple. But it doesn't really matter if you are installing ceramic coating on your leather steering wheel, your leather dashboard, or really any leather trim that you have inside your car - the procedure is the same. You can read our article on 'How to Apply Ceramic Coating' here for more details. The preparation stage differs when you apply a ceramic coating on leather, but the application is pretty much the same. 1. Preparing the Surface The first thing to do, before we apply a ceramic coating on the leather, is to prepare the surface. Vacuum the surface to remove all debris and heavier dust that might be there. Once that has been taken care of, we need to fully clean and degrease the surface. We suggest you use a dedicated interior cleaner such as CARPRO Inside and a leather brush to help agitate any stubborn contamination that might be there. And then, wipe and dry the surface using a clean microfiber towel. Do not use the same cleaning products that you would use for the exterior of the car. These chemicals are simply too aggressive for the leather finish, and they might damage it. Also, if you are using a brush to help clean the leather, then make sure that the brush is designed for leather. If it is not soft enough not to damage the leather, it is not a good choice to use, and we suggest skipping it. Don't use cleaning products that contain alcohol as their active ingredient because such products will dehydrate the surface of the leather and cause it to look dull. 2. Ceramic Coating Application Next, you follow the instructions that come with the ceramic coat product. Take the foam applicator that came with the product and wrap the micro suede cloth around it. Open the glass bottle that contains the ceramic coating and apply a few drops along the whole length of the suede cloth. Make sure it is saturated but not too much. Now, apply it gently and evenly across the whole surface. It is possible that when you apply the ceramic coat on your leather seats, you miss a spot or two. To help prevent this, work in sections, and make sure to apply the coating on all the creases of the leather seats. When you are sure that you've applied the ceramic coat uniformly and thoroughly, the next thing is to buff it off. Wait for about 2-3 minutes and then take a clean and dry microfiber towel to wipe off any residue and level the coating. Now, we have to let the coating cure. 3. The Curing Process The curing time of a ceramic coat will take several minutes. For example, CARPRO Leather is dry to the touch 10 minutes after application. You can apply the 2nd layer if you want; just wait for at least 30 minutes after the initial application. Make sure to avoid any water for the next 4 hours. At that point, you can start using the car normally. The best thing to do, and what we usually do if a customer is in a hurry, is to leave the vehicle overnight to get a few more hours of curing time. After 4-5 days, the coating will be fully cured. If you would like to learn more about the curing process of ceramic coatings then read this article we wrote. 4 Advantages of ceramic coating your car's leather If you've read everything above and you are still not convinced about using ceramic coating for your car leather seats, here are some advantages in a bit more detail to help convince you better. 1. Ceramic Coating Makes Maintenance Easier After you apply the ceramic coating on the leather seats, you will notice that dust and dirt can't stick to the surface, and the seats are easier to clean. Ordinarily, when you spill any liquid like coffee or water on your leather seats, the liquid is absorbed by the seats, and they become difficult to clean. However, after you apply the ceramic coat the liquid just stays on top instead of getting absorbed. The hydrophobic layer created by the ceramic coat prevents soaking, so you can wipe off liquid spills easily. Also, when cleaning ceramic-coated leather seats in the future, all you have to do is to take a damp microfiber towel and wipe the surface clean. That's it! 2. Ceramic Coating Protects the Car's Leather Against Extreme Heat Exposure When you apply ceramic coating to leather surfaces, it creates a hydrophobic layer that protects the leather seats from getting damaged due to exposure to the sun. Ceramic Coating contains UV inhibitors that help protect the leather and keep it looking new. Many people don't know that when they park their vehicles in the hot sun for a long period, the cabin will overheat. And that can dry out the leather seats and cause ruin if the seats are not initially covered in a ceramic coat. Ceramic coating will prevent the drying, fading, and cracking of leather surfaces that could be caused by exposure to the sun and other environmental factors. 3. Ceramic Coating Maintains the Aesthetic Value Of Car Leather Seats Ceramic Coating for leather will not change the texture or the color of the leather in your car. It will also not make the leather glossy but will keep its original, usually matte, finish. After you apply a ceramic coating, though, you will realize that the leather surface becomes a bit smoother. So, the ceramic coating will help your leather seats preserve their original appearance. 4. Ceramic Coating Provides Long-term Protection As mentioned earlier, the ceramic leather coating will last longer than other protective coating methods like waxing and conditioning. It can last up to two years before it requires a do-over. When you compare that with doing conditioning weekly or waxing four times a year, you realize that it is economical, both in terms of money and time spent. So, with ceramic coating, your leather seats will continue looking new for a very long time. If you keep up the application and the maintenance, it will probably last you the full lifetime of the vehicle. Ceramic Coating For Leather That We Recommend - GYEON Quartz LeatherShield GYEON Leather Shield is our ceramic coating of choice when it comes to ceramic coating leather surfaces. Over the years, we've tried many different brands (including the popular CARPRO Leather 2.0), but through all of that, we've stuck with this one. This advanced SiO2-based formula is specially developed for automotive leather, suitable for both natural and synthetic types. It offers robust protection against dirt, UV rays, and the daily rigors of use, all while maintaining the leather's natural matte finish and feel. We appreciated its simplicity — one layer does the job, preventing dye transfer from clothing and not altering the leather's comfort. Prior cleaning with Q²M LeatherCleaner ensures optimal results. Test on a small area first, especially on sensitive leathers. It doesn't stiffen or make the leather slippery, a common concern with other protectants. In our opinion, GYEON Quartz LeatherShield stands out for its protective qualities and ease of use, making it an excellent choice for preserving the look and feel of automotive leather interiors. Buy it on Amazon via our affiliate link (to help us grow the website): https://amzn.to/3TFxDcY FAQ Is ceramic coating safe for all types of leather in cars? Ceramic coating is generally safe for most types of leather used in vehicles. However, it's crucial to test a small, inconspicuous area first or consult with the product manufacturer to ensure compatibility with your specific leather type. How does ceramic coating affect the feel of leather? While ceramic coating preserves the leather's look, it may slightly alter the tactile feel, making it smoother. It doesn't stiffen the leather or lead to cracking, maintaining its natural suppleness and comfort. What maintenance is required after applying ceramic coating to leather? Post-application, routine maintenance involves simple wipe-downs with a damp microfiber cloth to remove dust and spills. Avoid harsh cleaners, and periodically check the coating's integrity to ensure continued protection. How does ceramic coating compare to other leather protection methods? Ceramic coating offers superior durability and longevity over other methods like conditioning and waxing, providing up to two years of protection, easier maintenance, and better preservation of the leather's aesthetic value. Final Words — Leather Ceramic Coating Embracing ceramic coating for your car's leather is a game-changer, offering long-lasting protection, ease of maintenance, and preservation of the luxurious look and feel. By understanding the application process and benefits, you can ensure your vehicle's interior remains pristine and inviting. Whether it's combating harsh weather, preventing wear and tear, or just keeping that new-car elegance, ceramic coating stands out as the ultimate guardian for your leather surfaces. Cheers!
- How to restore headlights?
Wait a minute! This is a website dedicated to Ceramic Coatings and Paint Protection in general. Well, I do want to learn 'How to restore headlights', but why am I reading about headlight restoration here? Well, that one is simple. There are two reasons. The first is that headlight restoration is a very common service that is offered in almost any shop that does any type of car detailing or even car washing. The second reason is that once you restore those headlights, you will need to protect them. And, of course, one way to protect them from getting yellow again is by using Ceramic Coating. Contents: Why do headlights yellow? How to restore the headlights of your car? How to prevent headlights from oxidizing? Recommended Ceramic Coating Full Headlight Restoration Kit FAQ Final Thoughts We were all at least once in a place where we were staring at the headlights of our car, and they looked all yellow, hazy, dull, foggy, and perhaps even cracked. In other words, they looked bad. Beyond the aesthetics, they also performed worse. So, not only did we have bad-looking headlights on our car that were ruining the overall image of the vehicle, but we also had a safety hazard on our hands. Headlight restoration is a common service that almost all car detailing or car cleaning shops offer. It is also a favorite among DIYers because it is pretty easy to do. And even if you do make a mistake, it is extremely forgiving. You, even as a beginner, have a huge amount of room for mistakes. The question that comes to mind is - when should we do it? When should we restore our headlights? Well, when they look something like this: Why do headlights yellow? Due to a process called oxidation. In older cars, headlights were made of glass. And those won't oxidize, no matter how old they get. They could get dirty, but once you give them a good cleaning, they would sparkle and look like new. On most cars today, headlights are plastic, or more specifically, they are made from acrylic. Acrylic is also more commonly known as plexiglass. And if you ever had anything made of transparent plastic, once it got old, it tended to haze up, and get cloudy. It would also start getting yellow as time passed. The reason plastic gets yellow is UV radiation. In other words - the longer transparent plastic is exposed to the sun, the faster it will yellow. How to restore the headlights of your car? Here we will go through a few steps to ensure you go from this: To this: We can polish headlights using several techniques and methods and many different variations of those methods. We will share the one we use to get great results. To restore your headlights, you will need the following: masking tape spray bottle (just use any that you have around the house) sandpaper 400 grit sandpaper 600 grit sandpaper 1000 grit sandpaper 2000 grit two microfiber applicators compound polish isopropyl alcohol microfiber towel /or/ paper towel ceramic coating Clean the headlights, or the whole car if you want to remove any dirt or bugs, or sap that might be on them. You do not want to contaminate the sandpaper with mud and dirt because it will then perform poorly. VIDEO: If you are a person that likes these things in a video, you can check out Chris on the ChrisFix Youtube channel. He does the process slightly differently and uses UV-resistant 2K Clearcoat to protect the headlights. But you will get a general idea of what the headlight restoration process entails. Masking tape You want to mask off the area you'll be working on. So, you want to tape around the whole edge of the headlight. This way you are creating a protective barrier so we don't scratch the paint. Sandpaper Sandpaper comes in grades. The lower the number, the more aggressive the sandpaper is. Contrary, the higher the number is, the finer it is. Once you've masked off around the headlight and have no car paint exposed, you are ready to begin. Take your 400 grit sandpaper and take your spray bottle that has been filled with water. Spray water onto the headlight and onto the sandpaper. Using water and sandpaper is also called 'wet sanding'. Water is added to lubricate the surface that you are working on, to collect the fine sanding dust that would otherwise make a mess. Water also helps reduce friction - this way, you have way more control over the sanding process and prevent accidental damage from heat buildup. Use circular movement. Make sure to sand the whole surface of the headlight and use light to medium pressure. Do not press too hard. And keep the surface wet at all times. If you are using low-quality masking tape or masked the headlight poorly, you might find the masking tape falling off because of the water. In that case, use a paper towel to dry the area and reapply the masking tape before continuing. It takes less time to dry and reapply a bit of masking tape than it takes to repair damage to the paintwork. You will notice a white milky liquid running down the headlight. That is the oxidation being removed from the plastic surface of the headlight. Make sure you have no remaining yellowing, old plastic, old film, or clearcoat before you go for the finer grit sandpaper. The reason you want to make sure you get all the nasty stuff now is that it will take you much more time and effort to do this with 600 grit. And it is questionable if you'll manage to do a good job even then. So stick to 400 grit until your headlight looks nice and hazy on the whole surface. Now, before you finish with the 400 grit, you want to do one final sand using horizontal movement. Now repeat the same process using 600 grit. You can use more pressure now. Circular movements first, then vertical after. 1000-grit sandpaper comes next. Circular movement and horizontal movement. Make sure to keep the surface nice and wet the whole time. Once you are done with 1000, go for the 2000 grit. Go for circular movement first and finish with vertical sanding. Now take off the masking tape because it is very wet. Dry the whole area around the headlight. Make sure to get all the droplets that are stuck around the edges of the headlight. Your headlight should look very hazy. You can barely see through it. But it should have a uniform look to it. Now you are ready for the next step. Alternative: Your hand hurts a lot by now from all the sanding. Probably even after only one headlight. Luckily there are alternative methods. You can get a headlight restoration kit that is used with a drill, such as the 3M Headlight Restoration Kit. Just follow the instructions on the kit, and attach the disc pad holder to the drill. Now stick the sanding paper to the pad, and you are ready to go. You won't be wet sanding with this method. But will instead dry sand. The idea is the same, except you have to look out for heat buildup. You will speed up the sanding process a lot, and your hand will not fall off. The only downside is that it cost a bit more, you need a drill, and it is going to be messy because you will be dry sanding. Compound and Polish If you have the option, then use a polishing machine for this step because it will speed up the process a lot. We would recommend Chemical Guys BUF 503X TORQX Random Polisher Kit. The reason we recommend this product is not only the polishing machine but what you buy is actually a full kit with polishing pads and different grade polishing liquids. And for beginners, this is a blessing. We know a lot of people that used this kit as a gateway into some more serious car detailing. If you do not have a polishing machine or do not wish to invest in one, then you can also do it by hand. It will take much longer and you'll also get an amazing workout as well. First, apply from compound liquid onto the headlight and use the applicator to spread it onto the whole surface of the headlight. Now use circular motions to work the compound into the headlight. Do the whole headlight until the compound looks like it is used up. Polishing compound and polishing liquid both work like sandpaper and both have their respective grit ratings. The compound liquid is coarser and should always be used first. The polishing liquid is much finer and is used for the final polishing step to bring out the shine in the paintwork. After the compound step, go ahead and apply a few beads of polish onto a new microfiber applicator and repeat the same step as with the compound. Once you are finished, use a clean and dry microfiber towel to buff out the remaining liquid from the surface. Isopropyl Alcohol Now all that is left to do is to degrease the surface. And Isopropyl Alcohol does an amazing job. You can also use Rubbing alcohol. Apply the IPA onto the headlight with a microfiber towel or a paper towel and clean the whole surface. This will remove all the oils that remain on the headlights after the compound and polishing step. Unlike car paint, where you only want to use a microfiber towel to avoid scratching, headlights are pure plastic, and they are much tougher than the clearcoat layer of the car's paint. You won't damage the headlight by using a paper towel. But if you want to be super sure, you can always use a microfiber towel for them as well, as it is not costly, and you will have peace of mind - and that is sometimes priceless. You now have a beautiful and new-looking headlight in front of you. Great job! If you like the way your headlights look now and you want to keep them looking this way, then you will need to protect them from UV radiation. If you don't, they will go back to looking nasty in a few months' time. So... How to prevent headlights from oxidizing? Well, that one is easy - you need to protect the headlights! That's great and all, but... how to protect headlights? Great question! Let's see what we can do about that. If you do not protect your headlights after you restore them, then it is only a matter of time before they start to yellow again due to oxidation. If it is summer or you live in a warmer climate, then the first signs of headlight yellowing can start showing even after a few weeks. This would be a shame after all the hard work you've put into making the shiny. Thankfully, there are a few things you can do to keep them looking new (e.g., ceramic coating, UV protection spray, clear coat, clear protection film, etc.). Of course - using a ceramic coating is one of the better methods; and one that we will cover (this is why a headlight restoration article is on a ceramic coating website, if any of you were wondering). So all that is left to do is to pick a Ceramic Coating to your liking. We suggest you use a true ceramic coating and not a ceramic coating spray. Ceramic Spray Coatings act more like sealants instead of like true ceramic coatings. This is why ceramic spray coatings will give you only about 4-6 months only, while proper ceramic coatings will give you years. And that is if you get a good quality product! Ceramic Coating We Recommend — CARPRO CQUARTZ UK 3.0 One of the standout features of CQUARTZ UK 3.0 is its ability to maintain clarity and resist yellowing over time by resisting UV radiation that comes from exposure to the sun. This is particularly important for headlights, as it ensures that they remain clear, enhancing both the appearance and safety of the vehicle. The coating's hydrophobic properties also make maintenance easier, as water beads off the surface, taking dirt and contaminants with it. Applying CQUARTZ UK 3.0 to headlights requires thorough preparation to ensure the best results. The surface must be clean, free of any residues, and completely dry. Following the application, it's essential to allow adequate curing time, which may vary depending on environmental conditions. Once cured, the headlights will exhibit an impressive level of gloss, alongside the protective benefits. It's worth noting that while CQUARTZ UK 3.0 offers substantial protection against oxidation, regular maintenance and care are still recommended to keep the headlights in optimal condition. This includes avoiding harsh chemicals and abrasives that could compromise the coating. If you're looking for more ceramic coating options then we urge you to check out our list of ceramic coatings that we recommend. To summarize, once you get a proper ceramic coating, apply it to the polished, degreased, and clean headlight. This will give the headlight an even deeper shine and a clearer look. But most importantly, it will slow the oxidation process because ceramic coatings have amazing UV-resistant qualities. Once the ceramic coating has cured, your headlights will look almost brand new and will stay that way for the next 1-2 years. Full Headlight Restoration Kit We Recommend — 3M Ultra Headlight Restoration Kit If you're looking for an all-in-one solution, then you can get a kit like this (this one is really good). The only downside is that this kit requires a drill (you can still use it without a drill, but that'll require some serious elbow grease; with a drill, it'll be MUCH faster and easier). The 3M Ultra Headlight Restoration Kit stands out as an exceptional solution for anyone looking to restore their vehicle's headlights to like-new condition. Rated highly for its effectiveness and ease of use, this kit is designed for heavy-duty restoration tasks, making it suitable for headlights that have suffered from severe oxidation, yellowing, and scratching. Here's a brief review and a step-by-step guide on how to use this all-in-one kit effectively: Preparation: Start by cleaning the headlights thoroughly to remove any dirt, debris, or grease. Use the included masking tape to protect the surrounding areas of the headlights from accidental sanding. Sanding: Attach the disc pad holder to your drill and start with the 500 grit sanding discs to remove heavy yellowing and oxidation. Apply moderate pressure and use a side-to-side motion for even sanding. Refining: Switch to the 800 grit white finishing discs to refine the surface, smoothing out any scratches from the previous step. Continue to use a side-to-side motion for consistent results. Polishing: Use the 3000 grit Trizact refining disc for the final polishing stage. This ultra-fine disc will restore the clear look of the headlight lens, preparing it for the final protective coating. Protection: After sanding and polishing, apply the protectant (if included in your kit version) to seal the headlight and protect it from future oxidation and UV damage. Buff the headlight for a shiny finish. FAQ Can I restore my headlights myself, or should I hire a professional? Headlight restoration is definitely a DIY-friendly task. With the right tools and a bit of patience, you can achieve professional-looking results without the need for professional services. It is also a great gateway into the world of car detailing! :D How often should headlights be restored? The need for headlight restoration depends on exposure to elements and usage. Generally, restoring headlights every one to two years or when significant dullness or yellowing is observed is advisable. Does applying a ceramic coating after restoring headlights offer any benefits? Absolutely. A ceramic coating acts as a protective layer against UV rays, reducing the risk of oxidation and yellowing. This prolongs the clarity and appearance of your headlights significantly. Can headlight restoration improve the overall safety of my vehicle? Yes, restoring your headlights improves visibility by allowing more light to pass through the lenses, enhancing night-time driving safety and the overall appearance of your vehicle. How to restore headlights — Final Thoughts Restoring your car's headlights is not only about enhancing its aesthetic appeal but also about ensuring safety through improved visibility. Over time, headlights can become yellowed and hazy due to oxidation, primarily caused by UV radiation exposure. This article has guided you through the straightforward process of headlight restoration, emphasizing that anyone can achieve professional results with patience and the right approach. Moreover, we've highlighted the critical step of protecting your newly restored headlights to prevent future oxidation. Ceramic coatings emerge as a superior solution in this regard, offering a durable, protective layer that shields against UV rays, thereby extending the lifespan of your restoration work. By incorporating a ceramic coating post-restoration, you not only maintain the clarity and functionality of your headlights but also contribute to the overall maintenance and value of your vehicle. Remember, regular care and protective measures can keep your headlights shining bright, ensuring both beauty and safety on the road. Cheers!
- How to prepare a car for Ceramic Coating? - A Detailed Guide
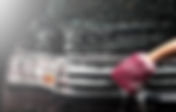
So, you have finally decided that you want to Ceramic Coat your beloved car! That is great news. We are happy for you because we know how we feel when a car is protected with Ceramic Coating and when you see it for the first time the morning after. The first drive, first rain. When it comes to cars and exterior detailing, it's the closest thing to magic. Now, let us start! You have your ceramic coating product in your hands. You're looking at your car, and might be thinking, 'How to prepare a car for Ceramic Coating?'. Well, there is actually quite a lot you will want to do. Contents: Steps to washing your car properly What products will we need to wash your car The two-bucket washing technique How to prep? - Long and Detailed Explanation Can I clean and detail my car on a budget? There are a couple of answers to that question, and we will try our best to answer them as best we can and transfer our experience into words that make sense and are easy to read. Short Answer - You have to wash your car and have a clean, dry, and degreased surface before applying the Ceramic Coating. Long Answer - Oh boy! There are a couple of steps that we will do to prepare the paint on your car for the coating, and we will need a few things to work with throughout those steps. So let us make a quick list of the steps and a list of all the materials that we would normally use to complete all those steps successfully. We will first list them and then do a detailed explanation as to what everything is and what tips and tricks we recommend when performing those steps. Before you even start, if your car has a old ceramic coating applied, you'll need to remove that old coating first before applying the new one. Steps to washing your car properly: If you have any damage to your paint, now is the time to correct it Make sure you are working in either a closed and ventilated closed space ( e.g., your garage ), or if outside, make sure the sky is calm, it is not windy, the sun is not scorching, and your car is not under a tree or somewhere where birds would usually sit around Spray foaming your car using a pH neutral Shampoo and clean it using a detailing brush to loosen all the dirt in all the corners and tight spaces; then use a microfiber glove to agitate all the dirt on the car's surface using only horizontal or only vertical movements to avoid creating swirls Using brake dust cleaner on your wheels and using a separate brush to loosen all the dirt and brake dust off your wheels Washing off all the dirt and foam from your car using a power washer and spray foaming the car a second time just to make sure you've got all the dirt off Now you want to clay bar the car to remove all the contaminants that might be stuck inside the surface of the clear coat Using a polishing compound, go over the exterior surface of your whole car Using a fine polishing compound, you want to polish your whole car to bring that perfect shine Using a degreaser or isopropyl alcohol, you want to remove all grease, oils, or fat from the surface of your car before applying the coating Your car is now ready to be coated with Ceramic Coating What products will you need to wash your car: power washer ( garden hose with attachment can be a worse alternative ) snow foam canon ( snow foam gun is a much weaker alternative, but it will do the job ) gloves pH-neutral Car Shampoo microfiber washing glove bucket with grit guard a dozen of microfiber towels a few drying microfiber towels brake cleaner a car detailing brush clay bar spray bottle dual action polisher ( regular polishing machine or even microfiber applicators can do the job, but obviously either harder or simply much, much slower) car compound car polish degreaser or isopropyl alcohol sandpaper ( 600, 1500, 2000, 3000 grades ) If you do not use these recommended items and instead opt for alternatives or skip some, you will almost certainly end up with much worse results than you would with them. The two-bucket washing technique If you do not have access to a snow foam cannon or gun, the best way is to use this technique. It is very simple yet extremely effective. All you need is 2 clean buckets to hold water and a grit guard for one of them. You will be using the bucket with the grit guard to rinse and clean the microfiber washing glove while using the other one to get clean water or a cleaning solution. Ok, now, for those uninitiated, let us make sense of all of this! Short Explanation Let us assume you have all these products and you have a place where you can work for the next couple of hours. Part of the preparation is also knowing how long all this is going to take. In reality, especially if you are new to this, you should count on the car being in the garage for the next 24 hours at least. Better yet, 48 hours! If you are working outside, then prepare in such a way that the weather forecast is not forecasting rain, snow, hail, windy weather, or very hot temperatures. It might be a lot to ask, but if you want to do it right, the conditions need to be right as well. The reason for all this is that you need to wash the car exterior thoroughly and most likely polish the paint as well. All that will take you several hours ( especially if you decide to throw in the interior as well since you are already washing the car ). If you are using a ceramic coating for the interior of your car, then you are likely looking to ceramic coat the leather finish inside your car ( seats, steering wheel, etc. ). In the article above, you can learn everything there is to know about ceramic coating for leather. Detailing a car's surface using compound and polish takes a very long time. You are looking at 3-5 hours easily for a medium-sized vehicle unless you are experienced. Only then can you start with Ceramic Coating your car. Here, depending on the brand of Ceramic Coating you are using, it might require you to apply 2 coats with some waiting time in between. After our car has been coated and buffed, it usually takes around 24 hours for the Ceramic Coating to fully harden and about 1 week to cure on top of the car's paint fully. During those 24 hours, you do not want anything interfering with the coating. In fact, you do not want dust, dirt, debris, water, high temperatures, and particles, in general, interfering with your car's paint or the Ceramic Coating itself. Once you have survived all this and you have done a good job cleaning, detailing, and coating the car, you can give yourself a well-deserved high five as you now have a Ceramic Coated car! Long and Detailed Explanation If you have any damage on your paint that needs to be corrected, you can do that now since you will have an additional 24 hours of wait time for the new paint to harden enough for it to be considered safe to work with. You can do that now, but we highly suggest washing the car first so you have a better field of view on the actual condition of the car's paint before making that decision, so you don't miss a spot. First off, you can get your car wet by using the powerwasher. The purpose of this is to loosen up the dirt a bit so the shampoo can do a better job of removing it later. After that, you want to use your foam cannon and pH-neutral shampoo to snow foam the entirety of your car's paint and, as per the shampoo's instruction, leave it to work the dirt from the surface of the car as gravity does its thing. If the car has some very dirty or greasy spots or is generally in bad condition, you want to use a microfiber glove and choose either horizontal or vertical movements and cover the whole car or just the difficult areas to agitate all the dirt further. Also, take a detailing brush and brush the shampoo into all the crevices, edges, and places difficult to reach with the microfiber glove. Dirt can be hiding in between panels, around the rubber areas, even though the car might look mint fresh. After all this, you want to give the car another wash with water to remove all that now loose, dirt, and excess shampoo foam that was leftover before it starts drying and leaving water spots or marks. Always keep in mind that the lower parts of your car and wheels will be extra dirty, and it is considered best practice to clean them with a separate bucket and a different microfiber glove or towel dedicated only for those areas since they will contain larger particles that might create creases or swirls in the cars clear coat much easier. Spray your wheels with a brake dust cleaner and let the chemical reactions take place. All the places that contained brake dust will turn purple. Agitate all the dirt on the wheels with a larger detailing brush before using the microfiber glove. Once the wheels have been cleaned properly, rinse the area using water with the pressure washer. Brake dust is notoriously difficult to clean if not using brake dust cleaner. It is important to dry all wet surfaces because most waters contain minerals that will stay on the paint's surface after the water dries. The best way is to use microfiber drying towels. They are thick and are designed to absorb water the best. Using regular microfiber towels to dry the surface of the car is also ok, but keep in mind that you will burn through them much more quickly, and you will be left with wet or damp towels that you will need to dry. So unless you have dozens of clean microfiber towels lying around, we suggest using those specially made for collecting water. Now is the time to inspect the paint of your car. It is safe to say that you will be polishing your car, so you don't have to look for swirl marks or light scratches. You are looking for paint chips or deeper scratches in the paint where the scratch goes all the way to the primer layer or the bare metal of the panel at hand. You can easily check if the scratch can be buffed out using a polisher by pouring water or some liquid grease ( e.g., WD-40 ) and check if the scratch is still visible. If it is not, that means the scratch is not deep, and it will buff out, but if it is still visible, that means the damage went through the clear coat layer, and you will have to correct the paint. You can do that by taking a small detachable panel part of your car that is the same color as the rest of your car. And also taking the color code of the car. It is usually found on a sticker at the side of the inside of the driver's door. Take that panel and the code to your local paint shop and have them mix up a small amount of the color you brought for a 'touch-up job' on your car's paint. They will most likely already know exactly what you need. You can get it in various forms ( e. g. spray can, tin can container, touch-up stick, etc. ). We suggest you stay away from the spray version. Just tell them you are a beginner, and they will know what to do. You will get a small number of your cars to paint in one can and some clear coat in another. Or sometimes you will get them mixed in one. If it is the first option, then just mix them before when you do the paint correction. Before correcting the paint, make sure that the areas to be fixed do not have rust in them. If they are rusty, the rust will eat even through the new paint, so make sure to remove the dust first and apply primer before using the touch-up. If there are lots of rusty spots, perhaps consult a professional to remove them and respray paint the affected panel. Using a small painting brush, a toothpick, or even an ear cleaning pick, it doesn't really matter. What you want to do here is apply the paint onto the paint chip area or the deep scratch filling the cavity and leaving enough paint to form a small hill on top of the paint. You want to make sure the whole area is filled. The excess paint will be sanded down later. You now need to wait 24 hours for the clear coat to harden and for the new paint to bond with the old paint. The new paint will cure for up to a month in reality, but after the initial 24 hours, the paint is hard enough to be worked with. Note that you can use this technique only to fill very small areas of damage on your paint. Any large defects on the paint will need to be resprayed. After 24 hours, you want to sand down the new paint, which is leveled with the old paint. Spray some regular water onto the area you are about to sand and use the 600-grade sandpaper. Work the area using a sanding block and have the sandpaper wrapped around the sanding block. That way, you are exerting equal pressure on the whole surface. Otherwise, you would be pressuring the sandpaper with your fingers creating an uneven finish. If you do not have a sanding block, you can use any piece of wood. Just do some research on the web to get an idea of what a sanding block looks like. On a flat surface, use the sanding block, but when working on angles or around edges, use a sponge, so you don't cut through the clear coat too quickly. Sand in only one direction (e.g., only up-down or left-right motions ) instead of random or circular motions. Once you have flattened the bulged new paint a bit, switch to higher grade sandpaper ( grade 1000 ) and go the opposite direction than the previous grade sandpaper. Repeat this process until you have finished with the grade 3000 sandpaper. If you wash the area you've worked with, close your eyes, and go over the area with your fingers, you shouldn't be able to feel any difference in the surface of the paint. Once it is slick, you are finished. Do the same for all areas you have done the paint correction on. Ensure you do not use too much force or sand for too long, so you don't burn through the clear coat. Since then, you will have to paint correct that spot again and wait another 24 hours for that new paint to harden. Once you have dried the areas you have worked on, the clear coat on them will be hazy due to the scratches from the sandpaper. Do not be alarmed. That is perfectly normal. The main part is that they feel smooth on the touch. The hazy part will buff out once we polish it later. So ignore that for now. Next up is using a clay bar on the car to remove all those contaminants or stubborn particles that have lodged themselves in the clear coat of the paint. Prepare a spray bottle with a mixture of water and car shampoo. Just a little bit of shampoo so that it leaves some foam. The idea is to create a slippery surface for the clay bar to avoid creating friction and burning through the clear coat. The way you use a clay bar is by flattening it and spraying the area you will be working on. If it still looks dirty, you see small particles stuck in the paint, or it just feels rough to the touch, which means the area is contaminated with dirt. After you have sprayed it, again choose horizontal or vertical movements and work the area with the flattened clay bar. Spray the area from time to time so it doesn't dry up, and make sure to check the area you are currently working on to see if it feels smooth. You can use the same 'closed eyes' trick. The idea is that you can not feel any transition to rougher terrain, so to speak. Once the clay bar has pulled dirt from the clearcoat, the particles will be stuck on the clay bar. If it looks dirty, just fold the clay bar onto itself and flatten it again to get a clean surface again. Cover your whole area of the car's exterior with the clay bar if needed. Once that has been done, you want to spray foam the car again, let it sit a bit, and rinse the car again with water. Dry it and prepare the car for the compound. We suggest a dual-action machine polisher. It is called 'dual action' because it rotates and does those 'wax on, wax off' motion movements at the same time, while a regular orbital polisher will just rotate at the set RPM. The Dual action is just much more effective than the Orbital one and does the job quicker and easier. It is also more beginner friendly. If you have none of these, you can really do the same with a microfiber applicator or even a microfiber towel wrapped around some sponge. But that will take ages, and prepare yourself. Your hands will fall off. That will be the hardest workout of your life! But we have done it, so it is doable. We do not suggest it, though! Use the polishing compound first and work your whole car. Apply the compound onto the foam pad. A few pea-sized beads will be enough. Without using the rotation, first, apply the paste from the foam onto the area you are going to work on and smear it over it. Work in small sections ( e. g. if you are currently polishing the hood, divide it into four parts, it will make your life easier in the long run ), and when activating the rotation, start on the weakest setting first to apply the compound paste to the area you will be polishing a bit better. The reason for applying the paste to the area on its lowest setting is so you cover the paste over the area you are working with, and you cover the paste more evenly over the polishing pad. If you would start with the highest setting, the paste would shoot in small particles all over the place, leaving you with the extra work of cleaning the car again. There is no need to mask the surrounding areas because that is very labor-intensive, and we won't need masking tape since we will be covering the whole car anyway. After it has been covered, switch to a medium to high setting depending on how quickly you want it done and how confident you feel. Stick to medium speed if you are a beginner, and once you develop a feel for it and feel a bit more confident, you can work on a higher setting. Make sure not to be too slow or polish the same area for too long since it will build up heat, and you can burn through the clear coat. Polishing Compound and Polishing Paste are both basically liquid sandpaper, just with a much much higher grade than what you would find on sandpaper since the abrasive particles are so much smaller. After you have compounded the whole car, do the same thing with the polishing paste. All those hazy areas we had on the sanded areas where we did paint correction should now be gone. Car Polish is the same as Car Compound but even finer, leaving a mirror finish. So let us do that, so we have the perfect glossy surface to apply Ceramic Coating on. Once you have polished your car, it is time to take a clean microfiber towel and some degreaser to remove all residue grease, oils, or fat that might have been left on the car from polishing it earlier to ensure maximum bonding with the paint protection you are about to use. We recommend you use isopropyl alcohol since it evaporates really fast and leaves no smudges when it dries. Congratulations! You now have a prepared surface to apply any method you choose to protect your car's paint. We recommend Ceramic Coating. But as always - the choice is yours! Now the question we often get asked... Can I clean and detail my car on a budget? Of course, you can, but not everyone has all those tools and items needed to perform a good detailing job on a car. There are numerous guides and tutorials on what and how to do it. We, in clear conscience, definitely cannot recommend that because the finishing result will be far from what someone would expect a car to look like after paint protection has been applied to their car. If you do not care for the car's look and just want to do the coating as it currently is, sure, of course, you can do it should you choose to, but we know that we wouldn't feel comfortable promoting something like that. Cheers!
- How to apply Ceramic Coating?
So you have your preferred product in mind or have already bought it. And you are wondering how you can apply ceramic coating to your car's paint the right way. What technique do you have to use to apply the Ceramic Coating, so you get the best results? Is it hard to apply Ceramic Coating? Can I apply the coating myself? These are all common questions when you haven't used the coating before. But before you start googling 'Ceramic Coating near me', know that we are here to teach you how you can do it all yourself. Everything you need to know from start to finish is in this detailed guide. The first thing you need to apply Ceramic Coating to the paint of your car is to prepare the surface. It needs to be clean, scratch, and chip-free. You get this by detailing the car unless it is a new vehicle, of course. You can click here to learn how you can prepare the surface of your car before applying any kind of paint protection to it. After the surface has been prepared, you need the following: ceramic coating kit (disposable) latex gloves 4-6 clean and dry microfiber towels rubbing or isopropyl alcohol masking tape* *if the product is not suited for glass or plastic surfaces and you are worried you might cover those by accident, then use masking tape to mask the edges of those areas. Otherwise, you will not need it. If the car has been degreased already, you don't need rubbing or isopropyl alcohol. If the car already has a ceramic coating that is about to expire, you'll first need to remove it (for best results). Ok! If the car's surface has been prepared and it wasn't decreased by any chance, now is the time to do it. You want to use alcohol instead of water and soap because water, especially tap water, might contain minerals that will leave micro scratches on the paint or leave watermarks if not dried off properly. They can be difficult to remove. Instead, by using isopropyl alcohol, you will remove all oils or grease or polishing residue that might have been left on the paint from touching the car or any waxes that were leftover or anything really. Alcohol evaporates really quickly, leaving a clean surface without any smudges or water spots. You want the surface mint clean to ensure maximum bondage when you coat your car. Put on your latex gloves, and we are ready to start! We use latex gloves because you have oils on your hands and fingers naturally. If by accident, you touch the paint or even when handling the applicator, grease or oils might prevent the coating from covering the surface, you are currently working on evenly. We want to avoid that! In the Ceramic Coating kit, you usually get a 50ml bottle that contains a transparent liquid - the Ceramic Coating of choice. It usually also comes with an applicator block. That is basically a sponge. And with it comes a suede or microfiber applicator towel. Small but big enough to wrap the towel around the applicator block. The reason you do this is the same as with sanding. You ensure even spread when applying the coating, as opposed to just using a towel that is guided with your fingers. You might get uneven coverage or finish. If, by any chance, the Ceramic Coating came without an applicator block and or an application towel - no worries! You can use a sponge ( use the soft side only or even cut off the rough side to avoid scratching the paint unintentionally ) and a microfiber towel instead. Just wrap the microfiber towel around the sponge and follow the guide. Should I use Ceramic Coating on plastic or glass surfaces of my car? Read the instructions that came with the product. If they say the Coating is safe to use on plastic or glass, use it. Otherwise, avoid such surfaces and stick to the car's paint only. If it does not say, presume it is not safe to use on either plastic or glass. If you are worried that you might get some Ceramic Coating on the plastic or glass surface of your car unintentionally, use some masking tape to secure that area. The first thing to do is - read the instructions! Not every Ceramic Coating is the same, and the application steps or methods might differ from other products. It generally instructs you to apply the coating on an area and buff it off after 1 minute, for instance. Now that might be 20 seconds, might be 5 minutes, or might be when rainbow-colored streaks appear, or even when it gets a bit hazy. Those times might differ depending on the temperature, humidity, and ventilation. After you have buffed it with a clean microfiber towel to a glossy finish, that is it. Now you usually have to let it sit for the next 24 hours so it hardens. It is usually not recommended to use the vehicle before those 24 hours, so the hardening goes uninterrupted without any foreign materials disrupting that process. That time might also vary depending on the manufacturer. The ceramic coating will usually fully cure within the next week or so. Also, that time can be different depending on the product used. During the curing process, the outer layer has hardened, and it is recommended not to use the vehicle until it completely cures for perfect results. But in our opinion and experience, it is safe to use the vehicle during the curing process. We would, however, deter from washing the car or taking it on some offroad adventure or even maybe avoid highways for that time. Nothing will happen, probably, but just to be sure, the coating is not damaged until it is rock solid and is bonded with the car's paint. Some products will require a second coat, usually some 1-3 hours after the first coat has been applied. If so, just follow the same instructions above after you have finished with the 2nd coat of Ceramic Coating. Since you are reading this guide, chances are you are a beginner and have coated one or two cars so far or even perhaps have never worked with Ceramic Coating at all. That is ok. The important thing is to work in small areas. For instance, do not try to cover the entire hood of the car at once. Because by the time you have covered half or two-thirds of the hood, you should already start buffing off the coating to avoid streaks or haziness. If you do mess up and end up with streaks or high spots once the coating cures, here you can find out how to get rid of them in detail. So once you have read the instructions and have a general idea of how to section the car's surface into smaller parts, you can open the bottle containing the Ceramic Coating. Get your applicator block with the application towel wrapped around the block and pour a few droplets onto the towel to get a full line on it to enable maximum application range. It will darken on the towel as if normally wet, so you know how much and where you have the liquid already. Now pick the hood panel to start with. Start applying the coating in a criss-cross pattern, meaning vertical lines first, from one side of the working area you've picked to the other. So a full line from one end to the other. Then do a line next to it, and so on. After you have covered the area you are currently working on, you can do the same, but with horizontal lines ( left to right ) on the same area to ensure full coverage of the designated area. As if painting a white wall with a brush. You'll do a full line from top to bottom and then do a line next to it until you have the whole wall covered. At all times, you see the area you have covered and where the coating still needs to be applied. Ceramic Coatings are transparent, and it will be harder to keep track of what areas you have covered so far. Just keep a mental map when applying the coating to the paint. Once you are done with that first area of the hood, continue in the same manner on the next part, and so on. If you notice you aren't getting enough coating onto the paint upon application, just get some more Ceramic Coating liquid onto the applicator towel again and continue where you left off. Once you complete the whole hood panel, it shouldn't take you more than a couple of minutes. You will get a general idea of how often you need to apply the liquid onto the applicator and how long it takes to complete a section or a full panel. Now, remember what the instructions said about when to buff off the coating. For instance, if it tells you to buff off the coating after 1 minute, then go ahead and buff off all the coating you just applied from the whole hood panel with a clean microfiber towel until you get a glossy shine. No haziness or streaks should be visible. Some products might tell you to wait 5 minutes before buffing. In those cases, you can decide for yourself if you want to proceed to coat the next panel and come back to buff it when it is ready or just wait to be safe. It all depends on how comfortable you are with it and how quickly you are working. Try to focus on quality ahead of speed because it is more important for it to be covered fully, and if it takes a few minutes more to do the whole car perfectly, it is well worth the time. Remember that the buffing time might be affected by temperature, or ventilation, or even humidity. So make sure you have read the instructions correctly. Some products will get hazy or even sweaty, while others will get streaky or even rainbow-colored when they are ready to get buffed off. Some, on the other hand, might not react in such a way at all. That is why it is important to prepare beforehand. I did not buff the Ceramic Coating in time! What should I do? If you do not buff off the ceramic coating in time, it might be forgiven after a few minutes, but quickly it will become tacky and significantly harder to buff off, even leaving streaks or hazy areas that won't come off. That is not a problem if you do not panic and act quickly. Just apply some more liquid Ceramic Coating on the problematic area and buff it off immediately. Do not use water! You can get more information about how to get rid high spots and streaks on ceramic coating in this article. I forgot to buff off the Ceramic Coating from a panel. What now? If a long time has passed since you were supposed to buff an area, try the method above. If it doesn't work and it is still hazy and visible, our suggestion is to complete covering the whole car with Ceramic Coating first before doing anything with the problematic area. What you will have to do is use compound and then polish on that the whole panel where the affected area is. So even if a small section is problematic, for instance, on the hood, you will have to compound and polish the whole hood. Sounds scary, but it really isn't. It will just consume more time. As long you are confident not to touch any other panel ( and you cannot use masking tape now ), you can do the compounding and polishing as soon as you have finished coating your car. If you do not feel confident, then wait 24 hours and do it then using masking tape on the edges of areas where the panels meet. After that, degrease the panel using a panel wipe, isopropyl alcohol, or rubbing alcohol and recoat the panel with ceramic coating again. Cover the whole car using this technique and buff off the coating at regular times as per instructions. Once the whole car has been coated, you are finished. Leave the car as it is now for 24 hours so the outer layer of the coating can harden enough so it cannot be affected by outside particles, debris, or water that easily. Once it has fully cured, in about 1 week, the car will be fully protected. It is important that while coating and for the first 24 hours that the car is not introduced to any water. Rain, washing, wiping at all. You do not water trapped in the toating or ruin the finish while it still hasn't hardened properly. Some products might ask you to do a second coating on the car sometime after you have finished with the first. They come with 2 applicator towels or pads. So use the 2nd for the second run. Simply follow all the instructions you have when doing the first one. And then wait 24 hours. Applicator pads used to coat your car will remain soft as long you are applying the coating on it. But if you leave it to dry for longer than 30 minutes up to an hour ( you will feel the crystalization under your fingers ), it will harden enough to make the applicator unusable. You can throw it away at this point since even washing it will not help. That is why Ceramic Coatings that require you to do two coats usually come with a pair of applicators or small suede or microfiber towels. MEGA PRO TIP: We have tried working with different brands. Some were a simple one-step coating, buff it off, and you are finished, while others required another coat. Now, our suggestion is that in cases the product you are using requires only one layer, you apply another coat after about 30 minutes to 1 hour. Just make sure to use a different applicator for the second run because the previous one will be rendered useless after waiting for so long. Well, that is it! Your car has been coated successfully. Make sure to keep it out of the rain or any contact with water or wind for the first full day so that it hardens. Then it'll be more resistant to outside elements. Once it is fully cured, it will give you all the properties it promotes, usually. Here you can learn more about ceramic coating cure time. To check some products that we have used multiple times and have reviewed for you and our opinion and score of the product, you can go to the Reviews section and perhaps find one suitable for you or even the one that you are using currently now and learn more about it there. For any more questions, you can refer to the Frequently Asked Questions article in our Education section of the site, or if you cannot find your question answered, you can write a comment with your question here or in the FAQ section, and we will try our best to resolve your issue as soon as possible. Have fun and happy coating!
- PPF vs Ceramic Coating vs Car Wax vs Car Sealant
What is better? Car Wax, Car Sealant, Paint Protection Film, or Ceramic Coating? How do two of them compare when you put them against each other? PPF vs ceramic coating, or perhaps wax or sealant - which one is better and, most importantly — why? Let's find out! Today, we are talking about the four most common ways to protect the paint on your car - wax, sealants, ceramic coating, and paint protection film. We will see what they are all about and which one is best for you! Contents: Most popular paint protection method? Car Wax Car Sealant Ceramic Coating Paint Protection Film Best Paint Protection - Product Life Best Paint Protection - Resistance to Elements Best Paint Protection - Resistance to Damage Best Paint Protection - Resistance to Chemicals Best Paint Protection - Gloss/Shine Best Paint Protection - Hydrophobic Properties Best Paint Protection - Application difficulty Best Paint Protection - Product Cost What about Graphene Coatings? FAQ Which paint protection method is the best? Waxes have been around for what seems forever, and later came car sealants and then ceramic coatings and paint protection film. And one might think that because of the stiff competition, car waxes indeed fell out of favor in the eyes of car enthusiasts. But, historically, that can't be farther from the truth. Let us check this graph to see what the interest in each of the above was like over the years. In the graph above, we can see the interest of people living in the United States for the four items above, all the way from 2004, when the other three slowly started showing up on the market. The graphs also show the interest for the four items relative to each other. We can see that when sealants hit the market, the interest in waxes dropped significantly. But as the years went by, the interest in sealants dwindled somewhat, and the interest in car waxes slowly started growing. Ceramic Coatings and PPF started hitting the market around the year 2010. And while most of those were only professional-grade products that only business owners could acquire, around 2016, consumer-grade products started flooding the market. The interest in PPF grew very slowly, as did the interest in ceramic coatings, but both got a spike in 2021-2022. The interest in both products grows steadily, even though the interest in ceramic coatings is larger. In this graph, we have taken out car waxes, so you see a clearer picture of what the interest was in ceramic coatings compared to sealants and paint protection film: You can see how sealants had a significant drop in interest while both ceramic coatings and PPF grew in popularity rapidly over the past few years. But what does this all mean? Is car wax simply superior to the other three? Well, no. These numbers only show that the interest for Car Wax is much higher than the interest for the other three products when you stack all the numbers together. There could be numerous reasons behind why that is, but it surely has to do with the fact that car wax was first. It is likely the cheapest product on average and is extremely user-friendly, even for beginners. If you consider what each product does to protect the paint of your car, the cost of each product, how long they last, and their benefits - then car wax has very little going for it except only one thing - a very nice warm glossy effect - which the other three simply cannot replicate. Each of the four products has its place in the car detailing industry. We will go into each of them, so you see what they are about and see how they work. We will also compare each of the four across various categories so you can compare each of the four depending on what you are looking for when you think about paint protection. Let's take a closer look at each of them: Car Wax Car Wax is the most traditional form of protecting your car's paintwork from deteriorating over time. Car waxes are carnauba-based, meaning they come from Brazil's carnauba palm trees. This is why they are sometimes called Carnauba Waxes. The Carnauba palm trees secrete this wax on their leaves to protect them from the harmful UV rays of the Sun. It gives hydrophobic properties as well. So they basically used that natures-technology to help protect the clearcoat last longer by giving it more UV blockers and UV inhibitors. Carnauba Wax also gives the paint hydrophobic properties and enhanced gloss. Car Waxes are known for the "warm glow" look they give the car after application. This effect is hard to replicate, and along with the ease of use, is likely the main factor why car waxes are still so popular today. While there are synthetic waxes available on the market today, carnauba-based car waxes are still the most popular ones. They usually come in paste form. Mothers 05500 California Gold Brazilian Carnauba Cleaner Wax Paste is a great example. You apply car wax with an applicator and wait for it to harden a small bit. Times may vary depending on the manufacturer's instructions. And then buff them off. Car Wax also comes in liquid form - Meguiar's A2216 Meguiar’s Deep Crystal Carnauba Wax, and in spray form as well. Since Turtle Wax pretty much started it off with spray waxes, we like to use one of their amazing products as an example - Turtle Wax T-9 1-Step Wax & Dry Spray Wax. It is a mouthful, but it is an amazing product if car waxes are what you are looking for. If you just want a car wax so your car looks like it belongs in a showroom, then give it some amazing prep work and use a premium wax like Pinnacle Natural Brilliance PIN-312 Souveran Paste Wax. They are expensive but are worth their weight in gold when it comes to car enthusiasts because of the way they enhance the paint on your car. You can learn more about Car Wax here. Car Sealant Car Sealants, or Paint Sealants as they are also known, are the detailing industry's answer to the short product life of car waxes. They are entirely synthetic and man-made out of polymers. This is why some people refer to them as polymer sealants. People, at one point, got tired of having to reapply for car wax every other week or so. It is expensive, time-consuming, and sometimes simply not doable at all. Not everyone has the same conditions for car detailing or extra time on their hands to wax a whole car. So, car sealants were invented. They tend to last for about 6-8 months tops. And that is even a high number in our experience, as paint protection lifetime depends on a lot of variables that we will not get into here. Otherwise, we would get into a lengthy discussion and completely detail this topic. They are effortless to apply. They are relatively inexpensive. And they work. What's not to like? Well, if it weren't for Ceramic Coatings, they would have been more popular today, but here we are. A big difference to car waxes is that car sealants give this "cold glow" feel to the car's paint once applied. Even the gloss sealants will give a synthetic feel. Same as car waxes, you can find car sealants in paste form as well. Meguiar's G210608 Ultimate Paste Wax is an amazing sealant that has carnauba wax technology infused into the product to make it even better! You can also find them in spray form, for example, Turtle Wax 53223 ICE Seal N Shine. But the most common way car sealants come in liquid form - Chemical Guys WAC_118 16 JetSeal Paint Protectant is a great example. This one is a well-known sealant used in the detailing world all over the globe. You can learn more about Car Sealant here. Ceramic Coating As you've been able to see from the charts above, Ceramic Coatings really became popularized around 2014. Detailing Companies started creating consumer-grade ceramic coatings, and they suddenly became available to everyone. Ceramic Coatings (according to science) always come in liquid form and are stored in small glass bottles. They are based on SiO2 polymer technology, and that is what gives them most of their amazing properties. An amazing ceramic coating that we always recommend is CarPro CQuartz UK 3.0. Usually, ceramic coatings come in 30ml bottles, but some come in bigger packaging. Inside the glass bottles, you will have liquid resin and solvents that help bond the resin on top of the clear coat layer of the paint. Once cured, the ceramic coating solidifies and hardness into a protective barrier that is 1 to 2 microns thick and has extreme hydrophobic properties. It also gives the car a crazy glossy appearance that is almost candy-like. Unlike car waxes and car sealants, ceramic coatings have a very high resistance to chemicals. This property ensures a long product life of up to 5 years. But we can say 2 years on average for the average customer. The lifetime of a ceramic coating is highly affected by the way you maintain the car. This way, you get amazing protection against the elements, UV protection, the looks, the water beading, and water sheeting, all in one product, for an extremely long time, and all that for a reasonable price as well. What's not to like?! A little bit after came Ceramic Coating Spray products. And just a quick disclaimer - they are not real ceramic coatings. They are Car Sealants that have SiO2 technology infused into their formula to give them some properties of ceramic coatings. But the low amount of solids that they contain is simply not enough to give lasting protection or even give the same type of protection that a traditional ceramic coating would give. We call them Ceramic Spray Coatings because this is the name they appear on the market with, and that is the name that people know them by. But again, they really are not ceramic coatings. We felt that we just had to mention that. Now, with that said, there are some great Ceramic Spray Coatings out there, such as Turtle Wax 53410 Hybrid Solutions Ceramic Wet Wax. You can check our Reviews section to get a better look at all the ceramic coatings that we have tested and reviewed on this website. You can learn more about what Ceramic Coating is in general, or if you prefer a more scientific approach, you can learn all about it here. Paint Protection Film PPF is short for Paint Protection Film. It is also sometimes referred to as 'Clear Bra'. PPF is a thermoplastic polyurethane in the form of a nylon wrap that you put on top of the surface of your car, and it serves as a protective barrier that soaks damage that would otherwise damage the paintwork of your car. PPF comes in different thicknesses and in different finishes depending on what the customer likes or needs. Usually, it has a glossy finish, and PPF is, without any discussion, the best paint protection method to protect the paintwork of your car from physical damage. Car waxes and car sealants do nothing to protect the car from physical damage. And while ceramic coatings give the paint increased hardness, they will not stop scratches or rocks that have hit your car with substantial force. This is not to say that PPF will give you 100% protection, but it is the best way out of the four to give you the best chance to avoid such damage. The paint protection film is also by far the most expensive paint protection method. It is also the most difficult to apply. All of that is likely the reason why they are not that popular. Even though we could see how their popularity has increased drastically in the last couple of years, you can buy PPF yourself, for instance, 3M Scotchgard Clear Paint Protection Bulk Film Roll, but the reason why we wouldn't recommend this is that a botched job is, simply put - wasted money. You need to be skilled in installing paint protection film to apply it successfully, and not only that. You will likely need two people to install paint protection film onto your car. You can learn more about Paint Protection Film here. We have learned what each of the four paint protection methods is and what the difference is. Let us rate them based on different categories. This way, everyone will be able to look up and read about what they care for in paint protection products and pick one that will give them what they need. Well, there is a lot of information here. Let's break it all down into digestible pieces! Let's start from the top: Product Life 1st : PPF 2nd : Ceramic Coating 3rd : Car Sealant 4th : Car Wax Here we see Paint Protection Film getting the gold medal and Car Wax getting the wooden one. Well, sometimes, minor differences make a huge difference. Not in this case, though. We are talking about a difference of up to 10 years (in ideal cases). That is A LOT! It simply cannot be ignored. Ceramic coatings do quite well in this category with an average life span of about 2-5 years depending on various factors such as: where you live, type of product used, quality of the product used, maintenance, etc. Car Sealants are all over the place here, but let us say you get an average of about 4-6 months. Some will give you more, while others will perform very poorly. And last place, car wax, gives us the least amount. While some products can give you more than a few months, the average for car waxes comes down to about 3 weeks to a month. It will heavily depend on how you maintain your car as well since their resistance to chemicals is the worst of the lot, and because of this, they tend to lose their properties quite rapidly if any stronger car shampoo is introduced. Resistance to Elements 1st : Ceramic Coating 2nd : PPF 3rd : Car Sealant 4th : Car Wax We are starting to see a trend here already, with PPF and ceramic coating battling it out on the top of the table while sealants and waxes are left behind in the dust. Well, that might not be the fairest thing to say - but we cannot deny that there might be something there. Both Ceramic Coatings and Paint Protection Film got an A in this category, but we gave the edge to ceramic coatings. The reason is that they simply perform better in the sun. UV radiation does almost nothing to coatings. And while PPF laughs at the sunlight as well, the thing is, once they start showing wear from extreme temperature, from high temps and very low temperatures, and you have to change them - ceramic coatings are cheaper, faster, and mainly less of a headache to replace, or revitalize. PPF might have a very high life span, but unless you take care of that one, you won't get to see those long years come to fruition. Resistance to Damage 1st : PPF 2nd : Ceramic Coating 3rd : Car Wax 4th : Car Sealant When we think about resistance to damage, we aren't talking about someone hitting your car with a sledgehammer or you crashing into a tree. We are talking about scratches, swirl marks, rock chips, and such. The type of damage a daily driver is bound to get sooner or later during its lifetime. And when it comes to those — Paint Protection Film is king. Ceramic coatings raise the hardness level of the paintwork and prevent some minor scratches that would've otherwise gone through. They stand second in this area because of that. However, Ceramic Coatings will not stop rock chips. Getting hit by a small stone when driving 40, or 60mph is simply too much. But... PPF might stop it! Well, not stop, but simply absorb the damage instead of the clear coat. Depending on how fast you're driving and the thickness of the PPF on your car, PPF can absorb some of the damage or the whole thing. This is why they stand at number one, almost uncontested. Car Waxes and Car Sealants simply do nothing to prevent any type of damage. Some could argue that waxes are greasy and thus serve as lubrication and thus prevent some damage, but that is simply not true. If the paint of your car is about to be damaged due to a contaminated microfiber towel or an automatic car wash, car wax will do absolutely nothing to prevent or reduce that damage. This is why both waxes and sealants get a zero in this category. Resistance to Chemicals 1st : PPF 2nd : Ceramic Coating 3rd : Car Sealant 4th : Car Wax Chemical resistance refers to what happens if you wash your car with regular car shampoo, one that isn't ph-neutral. Or what happens to the paint protection if you take your car to the car wash, a place where they sometimes use diluted hydrochloric acid, among other chemicals, in their shampoos to reduce cost? PPF comes out on top because there are really very few chemicals that will harm it. It is thick, and it is consistent. Unless you use some heavy industrial-grade chemicals, you will not damage the paint protection film. So, once you apply PPF to your car, you can be assured it will last. Ceramic Coatings are almost in the same bucket. The main difference is the thickness. PPF is from 8-12 mils thick, while a ceramic coating, once cured, is 1-2 microns thick. That means PPF is 8-12 thousand times thicker than ceramic coating. While both PPF and Ceramic Coating will get worn down eventually by using harsh chemicals, it will take you ages until you go through PPF and shows signs of wear and tear. Ceramic Coatings are thin enough that if you go heavy on them, they will eventually fall apart and start losing some of their properties. The advantage that Ceramic Coatings have over PPF is that ceramic coatings have a much higher resistance to chemicals and can withstand any chemical with a pH value from 2-12 consistently. This, of course, depends on the quality of the ceramic coating. That is why we do our tests and review ceramic coating products, so you do not have to pick blindly. Check our ceramic coating top lists and their respective scores in this category! Car Waxes and Car Sealants fall short in this category, and you can start seeing a trend here. While some top-quality sealants will resist more chemical damage, most will be removed after a couple of washes with cheap car shampoo. If some of the sealants were good, they had SiO2 technology in them and are what people call 'Ceramic Spray Coatings'. So even with those sealants, there was a percentage of ceramic coatings was needed to help. Car Waxes, on the other hand, will be washed off almost always after one or two washes unless you are using pH-neutral car shampoo. Gloss/Shine 1st : Ceramic Coating 2nd : Car Wax 3rd : PPF 4th : Car Sealant When it comes to gloss or shine, all of the products give amazing results. There are thousands of different products across the paint protection industry and all these products produce different results. We are talking about taking top-of-the-line items and comparing the results. Ceramic coatings, in our opinion, stand on top because they give crazy gloss. Almost candy-like! Car Wax gives a 'warm look' to the car. It enhances the color, almost deepens it, and leaves a glass-like appearance that has a yellowish undertone. It does look amazing and is probably one of the best-selling points when it comes to car wax! Unlike car wax, pretty much all of the other three paint protection methods leave more of a 'cold look'. White and completely transparent. We like using the analogy of looking at LED lights. White LED lights and yellow LED lights. Which one do you prefer more? The yellow light gives a warm feeling, while the white LED light has a coldness embedded in it. PPF, once installed, looks like someone poured sugar onto your car and let it dry. It can also give an amazing gloss, but we still think that ceramic coatings look way better since you get the same type of look, but just much more enhanced. Car Sealants are not to be underestimated. While many of them that we've tried over the years gave little to no shine, some of them did. And the results were nothing to laugh at. Hydrophobic Properties 1st : Ceramic Coating 2nd : Car Sealant 3rd : Car Wax 4th : PPF When it comes to water not sticking to the surface of your car, Ceramic Coatings are the clear winners. While good waxes and sealants do a great job - ceramic coatings do it better. Water sheeting and water beading are usually some strong selling points when it comes to ceramics. If you have a nicely prepped car that was ceramic coated using a quality product - you will see almost no water left on the car after rain or after doing a water test. The only issue that some ceramic coatings have are water beads that might be left on your car. And if those are left unchecked, they tend to become a headache later. This can also be improved by using toppers on top of the ceramic coatings that are designed to improve slickness even more. A great product that does this is CARPRO Gliss. PPF, on the other hand, has very little going for them when it comes to hydrophobic properties. They usually achieve this property by applying a ceramic coating on top of the paint protection film. If you are looking for the best way to protect the paint of your car - other than garaging it indefinitely - it is by applying 12 mils thick PPF and getting a great quality ceramic coating on top of it. Application Difficulty 1st : Car Sealant 2nd : Car Wax 3rd : Ceramic Coating 4th : PPF Again, we have PPF sitting in last place, and honestly, it would be fair even to put it lower. The difference in difficulty between applying a car sealant, which is spray and buff-off, vs. applying PPF is insane. The skill required is insane. It is almost always at least a two-man job. There are some people that claim they can apply PPF on a car solo. But we either call bull on that, or if there are some, we imagine them as lonely hermits living alone up in the woods somewhere, and legends are sung in their name. Suppose there are some of you that can genuinely apply PPF solo. And not do a terrible job, but actually apply it perfectly, alone. In that case, hats off to you. We want to meet you! Ceramic Coating requires some awareness of what you'll be facing, some basic training, and a good idea of how you'll prepare for the job and knowing how to apply the product. Especially those consumer-based products really made it easier for the average Joe to apply a ceramic coating DIY style. Car Wax is mostly applied, waiting for it to stiffen up a bit, and then buffing off with a microfiber towel. It's straighforward, but it still has some room for error. Car Sealants are by far the easiest to apply. It is almost child's play. You just can't go wrong. Just follow the instructions on the product. It is either apply and buff off or apply, wait, and buff off. Some sealants even are applied with a touchless method. You spray them, and by using a pressure washer, you spread the product around the surface of the car. If you mess up something or miss an area of the car, just redo it. Cost 1st : Car Wax 2nd : Car Sealant 3rd : Ceramic Coating 4th : PPF Again, PPF is last. It is by far the most costly, whether you apply it yourself or pay a professional to do it for you. Ceramic Coatings come in at 3rd place because it is generally the most expensive product after waxes and sealants. Waxes are usually considered the least expensive, and sealants are probably very close in cost to car wax. Of course, it all depends on the product you are buying and where you are buying it from. Is it from a distributor, or is it straight from the source? Also, keep in mind that you can easily find car wax that is many times more expensive than a top-quality ceramic coating because of the premium feel it entails. The same goes for other paint protection methods - if you are looking for expensive ones, you will find them. We are simply talking about the general price that you'll be paying for each of the four paint protection methods. What about Graphene Coatings? Graphene coatings became very popular recently, and they came out with promises that they help with removing leftover water beads and have some cool temperature-resisting properties. We still strongly suggest you look at them strictly as Ceramic Coatings. They do have graphene in them, more precisely, graphene oxide. But the argument of whether graphene actually does anything for the ceramic coating, or is purely snake oil, still remains an open debate in the detailing world. You can check out our opinion on graphene coatings which is based on testing results here. FAQ Can I apply ceramic coating over car wax or sealant? No, ceramic coatings should be applied to a clean, bare surface. Applying over wax or sealant can hinder proper bonding and reduce effectiveness. How often should I reapply car sealant for optimal protection? Generally, reapply car sealant every 6-8 months. Frequency can vary based on product quality, weather conditions, and car usage. Are there any special maintenance requirements for paint protection film? Yes, avoid harsh chemicals and abrasive cleaning tools. Regular washing with pH-neutral shampoo and occasional reapplication of a top coat is recommended to maintain PPF's effectiveness. Can I use automatic car washes with ceramic coatings or PPF? While both can withstand automatic car washes better than waxes or sealants, hand washing is recommended to prevent potential abrasion or chemical damage. So, final thoughts on PPF vs Ceramic Coating vs Wax vs Sealant: Which paint protection method is best? The better question would be, 'Which paint protection is the best for you? — ppf vs ceramic coating'. We can take a look at all the data we have gotten from the above categories, and we will get this graph: Just by looking at this, you would be forgiven for thinking that Ceramic Coating is the clear winner here. And in our opinion - it is. But that has very little to do with what you can see in the above graph. The truth is, there is no 'best' paint protection method. You simply have to consider the factors that affect you the most. The things that are important to you. You have to consider things like budget, where you live, is the car a daily driver or a car that mostly sits in the garage. You have to think about exterior car maintenance - will you simply go to a car wash, or will you properly clean your car? Will you be using pH-neutral car shampoo? Are you looking for a glossy finish, or do you care about hydrophobic properties? There are simply too many factors that you have to consider depending on where you live or the way you handle your car. We suggest going through each category and looking at what matters to you the most. Start from there and see where that takes you. Our website is about Ceramic Coatings, and as we've mentioned previously - we do believe that ceramic coatings are the overall best paint protection method simply because they cover the disadvantages of all the other three paint protection methods very well and perform great overall in the categories. And in some, it is the best, which further strengthens our claim. We hope this guide sort of gave you a bit more insight into the car detailing world and helped you make the choice that best suits your needs when it comes to protecting the paint of your car. This only leaves us with your vote on what you think is the best paint protection method for you. Cheers!
- Review: Nano Bond Ceramic Coating PRO
This summer we have been quite busy in our shop, but, we have made sure to get more ceramic coating products that you guys recommended and test them out thoroughly to see how they perform - in the real world. Today on our hands, we are taking a closer look at Nano Bond Ceramic Coating. We are of a firm view that marketing is important, and that is true. Many would agree. After all, you do want to sell a product that you have created, of course. We do, however, have a problem when the marketing quite outshines the product in every single aspect. Give the marketing team a raise, great job for them, but the repercussions of that reflect very poorly on the longevity and integrity of the company that pushed out the product, and most of all - the paying customers are the ones that suffer the most. Is Nano Bond Ceramic Coating Pro a product that will leave a sour taste in your mouth once you've tried it, or will it end up being amazing? *WARNING: The above sentence is obviously a metaphor - DO NOT DRINK any ceramic coating product, ever. Thanks! Here we will find out the answer to the age-old question - is Nano Bond Ceramic Coating any good? Well, perhaps not 'age old' but we had a few people asking about how this particular product performs, so naturally, we gave it a go! Contents: Nano Bond Ceramic Coating PRO Specifications How to apply Nano Bond Ceramic Coating PRO? FAQ Final thoughts on Nano Bond Ceramic Coating PRO? Just to clarify - we are not sponsored by Nano Bond, or any other manufacturer of Paint Protection products, and we will test and review the product as it is in real-world conditions. We will follow the manufacturer's instructions during the application process and we will prepare the surface to ensure the best finish and best adhesion possible. We are leaving an affiliate link to all our review products but in case the product turns out to be of low quality or not as all as advertised we leave a warning to all our readers and the quality of the product will always be reflected in the grade we assign to it at the end of every review. So if you do not want to sit through all of this text, you can scroll down to the Average Grade and read our Final Thoughts to get a general idea of what the product is all about. Let's check out Nano Bond Ceramic Coating Pro Get your Nano Bond Ceramic Coating PRO on Amazon here: https://amzn.to/3PUv15C A small disclaimer - This product is called Nano Bond Ceramic Coating PRO, even though there is no "PRO" in its name. So we are not sure why that name, but there we go, that's how it is. These Chinese-made ceramic coatings have been popping up left and right since the moment ceramic coatings started becoming mainstream. Some disappeared after they received no traction in the market, but others stuck around and endured. With "Made in China", unfortunately, comes to a few question marks and some preemptive judgment. Now, we are not ones to judge before we see something in action. But red flags are always to be taken with some amount of caution. At least you know what to look out for. Nano Bond Ceramic Coating is one of those that stuck. It's been around for a while and it definitely received some good press. Nano Bond has their own website, but its main trafficking method has been Amazon. This product stands out mainly because of its price point, similar to how Weiruixin 10H Ceramic Coating does. Does this mean they are both the same? Of course not. This is why we do all these tests. To disregard presumptions and bias and stick only to real-world results and facts. Now let's see some specifications: Oxidant & Corrosion Resistant 3 years coating lifetime 20 % strength 25% color heat resistant 760 degrees Fahrenheit ( 400 degrees Celsius ) hydrophobic effect extra thick 30μm (microns) smooth, hard, and glossy finish 9H rating 30ml bottle Let's go through each one and see what they are all about. Oxidant & Corrosion Resistant This one is already starting out a bit weird. Corrosion is the side effect of oxidation. In fact, corrosion is damage caused to metal due to oxidation. That is great and all. The problem with this is that you are supposed to ceramic coat a painted surface. Ceramic coating is used to help maintain that paint for longer, as well as giving it some added benefits and hydrophobicity, gloss, and some enhanced color depth. The paintwork ( primer, base color, and clear coat ) is what is keeping the metal from corroding. So the ceramic coating directly doesn't really give any resistance to corrosion. Perhaps, if you applied ceramic coating directly on top of a metal surface would you get that benefit? But if you had that situation, then you have far bigger problems than just needing to preserve and protect the paint of your car. So, starting off with oxidation/corrosion resistance is a no. Nano Bond Ceramic Coating Pro definitely won't help you with that. 3 Years Coating Lifetime 3 years is a solid number for a ceramic coating. Some claim to provide more, and some actually do follow up their claims with some actual results. But nonetheless, if you get 3 years out of a ceramic coating, you are getting a good deal out of it. It would of course, heavily depend on how you maintain your ceramic coated car. 20% Strength 20% strength? We are not sure what they mean by that. Perhaps Nano Bond Ceramic Coating PRO is 20% better than its competitors? We are not sure, but we sure will test that! 25% Color A 25% increase in color depth is a lot. And after application, we will surely be able to see a clear difference. We do, however, have a red flag here because of this picture: To the average consumer, this picture looks amazing. But, it is also VERY misleading. While the right side of the picture might be what you get once you ceramic coat a car with Nano Bond Ceramic Coating PRO, the left side is the car before ANY preparation. If you want to go from the left side to the right side, you will need to do 7 steps of preparation to get this result. You can check out our guide to ceramic coat a car in 8 easy steps to get a clear picture of everything that has been done to the car before you got what you can see on the right side of that picture. And without any context, this does feel a bit scammy. If you were wondering if ceramic coatings are a hoax, then check out our article on that matter. Heat Resistant 760 degrees Fahrenheit ( 400 degrees Celsius ) What? Is this really a selling point that people fall for? Do you guys realize how hot 760 degrees Fahrenheit is? Any plastic or rubber surface on the car would melt. Aluminum surfaces wouldn't melt, but they would start to deform. Steel and glass surfaces would not melt, but they would be damaged. The glass that is used for windows in cars has plastic in them, they would definitely lose structural integrity at those temperatures and would become either unusable or unsafe for usage. Steel and the paintwork would also be damaged. When we see these crazy videos where people set their cars on fire to show how great ceramic coating is we go nuts, and not in a good way. People, do not set your cars on fire! And there is absolutely no situation where the resistance of up to 760 degrees Fahrenheit would be useful. Hydrophobic Effect Well, we sure hope so. This is one of the key features of ceramic coatings, and it would be a shame if Nano Bond Ceramic Coating didn't have hydrophobic properties. Extra Thick 30μm (microns) We call bull on this one. Considering that, after application, the average ceramic coating is 1 to 2 microns thick - 30 microns sounds insane. And again, not 'insane' in a good way. Smooth, Hard, and Glossy Finish All three can be easily tested once the product has been applied. 9H Rating 9H rating is the standard rating that Ceramic Coatings have. Some claim to go beyond that, while others forget to even mention their hardness rating. We have written in great detail what the 9H rating means when it comes to ceramic coatings as well, so you can learn more about that if you would like. 30ml Bottle 30ml is a standard-sized bottle for a ceramic coating. No surprises here. There is also one more issue that we've noticed. Namely, as you can see in the following picture - "... professional-grade ceramic coating." Professional grade ceramic coatings have so much solid material in them that they usually require UV lamps for the coating to be able to cure properly. And they are thicker than a regular consumer-based ceramic coating - but again, nowhere near 30 microns. Yikes! Also, another quote, "... 9H hardness coating creates an impenetrable layer of protection". 9H is not impenetrable, that is total bull, do not fall on such ridiculous claims. Again, you can learn all about what 9H means on our website. In fact, claims like these give ceramic coatings a bad reputation. So far, so crazy, if you ask us. Red flags are all over the place. Bad bad Nano Bond. What can we say? But, we are here to test this product. So let us put all of that aside and see if this ceramic coating product is any good. But then again, remember what we've said earlier regarding marketing. It can often be bloated to epic proportions just to push the product through the gates. Doesn't mean the product is automatically bad. It just shows that Nano Bond doesn't care what methods are used as long as they get results. Let's see how we are to apply this ceramic coating. How to apply Nano Bond Ceramic Coating PRO? First, as always - read the instructions! After that, you need to prepare the surface of your car. Once the surface is clean and prepared, you can begin the application process. On their official website, you can find instructions on how to apply it: How to apply Nano Bond ceramic coating. 1. Wrap the cloth over the coating sponge. 2. Apply a line of coating down the length of the sponge. 3. Spread the liquid on the car evenly in a cross-hatch pattern. 4. Once finished spreading, immediately use a towel to wipe and polish. Pretty straightforward, though there are a few things that e would do differently or at least specify. Use gloves Shake the bottle well before usage Work in smaller areas ( body panel per body panel ), so you know what parts are covered. Once applied, wait for the product flashing time ( note rainbow coloration ) and then wipe it down You can check out our detailed guide on how to apply ceramic coating to your vehicle. After applying the product and waiting for it to properly cure, we took it for a spin and properly torture-tested it. Check how we test ceramic coating products. Our verdict on this product: product life time when applied: B resistance to elements: C resistance to damage: D resistance to chemicals: B application difficulty: C hydrophobic properties: C gloss / shine: C Average grade: C Cost: 38.45$ / 1 fl oz 1.26$ / 1 ml FAQ Is Nano Bond Ceramic Coating PRO effective in protecting car paint? Yes, Nano Bond Ceramic Coating PRO offers decent protection for car paint, with hydrophobic properties, and can last up to three years with proper maintenance. How do you apply Nano Bond Ceramic Coating PRO? Apply by spreading the liquid evenly in a cross-hatch pattern using a coated sponge and cloth, immediately wiping and polishing with a towel after application. Does Nano Bond Ceramic Coating PRO live up to its marketing claims? While Nano Bond Ceramic Coating PRO performs adequately in real-world conditions, some marketing claims may be exaggerated. Its effectiveness and durability are reasonable but don't expect miraculous results. Final thoughts on Nano Bond Ceramic Coating PRO? There is a lot of foul play involved in the marketing aspect of this product. This simply cannot be ignored as it sets a bad reputation for the Nano Bond brand and any future product they might place on the market is automatically placed under a huge magnifying glass because of it. Other than that, how did we find this ceramic coating - was it any good? Well, considering their major selling point - the price tag - Nano Bond actually has a decent product under their belt. If you go into this with a cool and reasonable approach and lower your expectations to a realistic level, this product actually performed ok. For that though, you would need some experience with ceramic coatings, because, if you had none, you would definitely fall into at least one of those misleading traps we have mentioned above. We think that with the right maintenance, the product will last you the full three years. For the average user, less though. It would heavily depend on how you wash your car and whether you are using pH-neutral car shampoo. The product is actually fairly easy to install, but with all standard ceramic coating, the precision and preparation required in the application process give it a lower grade. Its hydrophobic properties were noticeable, yet not very impressive. Although, it endured through the testing and maintained the same level of hydrophobicity the whole time. Thus, its resistance to chemicals was top-notch. It did not succumb or falter as we threw all kinds of nasty chemicals onto the car. We have noticed swirl marks and scratches showing up even after washing the car with a sponge, let alone after some more aggressive driving on offroad terrain. So its resistance to damage was not very good compared to some better ceramic coatings out there. The promised gloss and enhanced color also didn't deliver. While you were able to see a difference under a lamp or in direct sunlight, the difference was small. Overall, would we recommend Nano Bond Ceramic Coating Pro? Well.. that depends. If you are a newbie and are looking to try out a ceramic coating for the first time - then this just might be the right product for you. Also, if you are looking for a quick and cheap way to protect your car's paint, then again, this might be the ceramic coating for you. Get your Nano Bond Ceramic Coating PRO on Amazon here: https://amzn.to/3PUv15C
- 5 year Ceramic Coating
Is there such a thing as a 5 year ceramic coating? Let's find out! We can eliminate all ceramic spray coatings because they simply do not last long enough for them to compete in this category. Ceramic Spray coatings, even though they do have some SiO2 in them, they are more like fancy car sealants. The amount of solids in them is very low compared to regular ceramic coatings. Contents: How long does a ceramic coating last? How do you guarantee that a coating will last for a specific number of years? FAQ 5 Year Ceramic Coating — Final Words Just to clarify - we are not sponsored by any ceramic coating brand or any other manufacturer of Paint Protection products, and we will test and review the product as it is in real-world conditions. We will follow the manufacturer's instructions during the application process, and we will prepare the surface to ensure the best finish and best adhesion possible. We are leaving an affiliate link to all our review products but in case the product turns out to be of low quality or not as all as advertised, we leave a warning to all our readers, and the quality of the product will always be reflected in the grade we assign to it at the end of every review. So if you do not want to sit through all of this text, you can scroll down to the Average Grade and read our Final Thoughts to get a general idea of what the product is all about. How long does a ceramic coating last? Well, most true ceramic coatings last anywhere between two and five years. That is quite the range. But that number is not a coincidence. There is more than one reason why that range is that wide. How long does a ceramic coating last not only depends on the quality of the ceramic coating but also depends on the owner and how the owner of a ceramic-coated vehicle maintains that coating. Learn how to maintain ceramic coating on your car, so it lasts for as long as possible. Let's check out how long some of the ceramic coatings on the market last: Notice that we didn't include some of the more popular ceramic coatings brands, such as Feynlab or Undrdog. The reason is that they do not disclose how long their product will last, except by stating that "it will last for years". And in our opinion, that is smart. This way, they are covered both from a legal standpoint, and they aren't deceiving their customers. It is true, though, that the coating will last for years if it is a true ceramic coating anyway. Some of these coatings have a great reputation behind their name, and most of us in the detailing industry would agree that CQuartz 3.0 will last 5 years easily - provided that proper maintenance has been applied. Or, for instance, that Gtechniq Crystal Serum Light will easily last 5 years, provided that EXO 4 was used as a top coat after initial application. Drexler also states that the coating will last 3 years, but can last 5 if two coats have been applied. We personally used some of these coatings ourselves and can say with confidence that a coating like Weiruixin 10H is neither 10H nor that it stays on a car for 2 years. Perhaps under more ideal conditions, but on a daily driver? No chance! On the other hand, we have two coatings on the top, claiming that they can last 7 years. Adams even goes a step further and claims that it can go up to 9 years! Those numbers are just crazy. Sometimes, a car doesn't even last nine years. We made a review on Adam's Advanced graphene coating, and it is a juicy one. We were certainly surprised by the way it performed. You can read the full review in the link above. Just because a ceramic coating has 'graphene' in its name, doesn't make it superior. You can read more about graphene coatings here. A graphene coating is not bad, don't get us wrong. There are some amazing ones out there. It is, after all a ceramic coating at its core. But just being graphene-infused won't give the coating an extra 2-4 years. How do you guarantee that a coating will last for a specific number of years? That one is easy - you can't! It is very hard to test whether a ceramic coating will last for as long as it claims to last. Not many people have that much time on their hands to apply a ceramic coating on a car and then wait for 5, 6, or 7 years to see if the coating is still there. And then there is the issue of whether you would still be relevant or will be eaten up by bigger detailing companies or some conglomerate. Not only that - you still have to account for the biggest problems that might affect the longevity of the coating, such as: the condition of the car was the surface of the car prepped properly? the quality of the ceramic coating do you live in a part of the world with extreme temperatures, both hot and freezing? is the car a daily driver or a show car? did you install the ceramic coating properly? how do you maintain the ceramic coating? are you using a pH-neutral car shampoo? are you performing a touchless wash? are you cleaning your microfiber towels properly? This list goes on and on and on. And we probably even missed a few key issues that someone might have. You cannot simply test out a ceramic coating and then say it will last for 7 years without giving it some context. We can always make some predictions based on the hardness level of the coating, the coating's thickness once cured, and its resistance to the elements and strong chemicals. This information helps us see if a coating will last for as long as the manufacturer claims it will last. But beyond that, in the end, it is mostly up to the owner of the vehicle to determine how long a ceramic coating will last. 5-Year Ceramic Coating we Recommend — Adam's Advanced Graphene Ceramic Coating This one is actually a 5+ year ceramic coating (9+ years as advertised), and it performs spectacularly. We've already done a review on Adam's Advanced Graphene Coating(alongside the product score), but here we'll summarize our thoughts on the product in case you're in a hurry! :D This advanced formula offers an impressive longevity (9+ years!!), thanks to a 50% increase in graphene resins, which significantly enhances the coating's durability. Despite skepticism around graphene coatings, the team confirms their effectiveness, with Adam's version standing out for its protection and ease of maintenance. It boasts features like protection from weather, chemicals, UV rays, and an ultra-high gloss that enriches the car's color. The coating is also extremely hydrophobic, making the vehicle easier to clean and less prone to water spotting. Application is straightforward, with the product working well on all car surfaces, including glass and wheels. While it's at a higher price point, the team believes the cost is justified by the protection and aesthetic enhancement it provides. Made in the USA, Adam's Advanced Graphene Ceramic Coating is a testament to quality and innovation in car care, setting a high standard for durability and finish. All in all — an amazing recommendation by us, the Ceramic Coating Expert (CCE) team! FAQ Are graphene coatings superior to regular ceramic coatings? Graphene coatings offer some advantages but being graphene-infused alone doesn't guarantee superiority. The overall formula and application are crucial. How can you ensure a ceramic coating lasts as long as advertised? Ensure proper application, use pH-neutral shampoos for maintenance, avoid harsh chemicals, and perform regular inspections and touch-up applications. What does 5-year ceramic coating do? A 5-year ceramic coating provides long-term protection against environmental damage, enhances gloss, and maintains the vehicle's appearance. Is there a 10-year ceramic coating? While some products claim up to 10 years of protection, actual longevity depends heavily on conditions and care. 5 Year Ceramic Coating — Final Words When delving into the world of car paint protection, the term "5 Year Ceramic Coating" often surfaces, sparking curiosity and skepticism alike. As we navigate through the realities and expectations surrounding ceramic coating, it's crucial to understand its capabilities and limitations. So, to wrap this one up: Can a ceramic coating last 5 years? Yes, it can. Will a ceramic coating last 5 years? For some, a ceramic coating will last a year. For others, it can last a lifetime. Depending on product quality and maintenance. Cheers!
- The Ultimate Guide on How to Remove Ceramic Coating Effectively
Ceramic coating has transformed the way we care for our cars, providing an unbeatable level of protection and an enviable mirror-like finish that every car owner desires. Its hydrophobic properties, scratch resistance, and long-lasting shine make it the go-to option for preserving a vehicle's aesthetics and value. But, it's important to know how to remove ceramic coating and why to remove it in the first place. The process of removing ceramic coating is a crucial yet often overlooked aspect of car maintenance. If not done correctly, it can result in damage to the car's paintwork, leaving you with a costly restoration job. In this comprehensive guide, we delve deep into the art of effectively removing ceramic coating, exploring various methods, tools, and essential tips. Understanding how to remove ceramic coatings is crucial for maintaining your car's shine and protecting your investment. Contents: The Necessity of Removing Ceramic Coating (the WHY) How to Remove Ceramic Coating (the HOW) 5 Signs of Damaged or Worn-Out Ceramic Coating (the WHEN) Consequences of Delaying Ceramic Coating Removal FAQ How to Remove Cerami Coating — Final Words The Necessity of Removing Ceramic Coating (the WHY) Regular maintenance is crucial to ensure you’re getting all the ceramic coating benefits. However, it may become necessary to remove this protective layer at some point. In this section, we will discuss the reasons why removing ceramic coating may become necessary. Renewing the Protection Ceramic coatings lose their effectiveness over time due to exposure to the elements. Reapplication ensures continuous protection against UV rays, contaminants, and environmental factors. Paint Correction When your car's paint develops swirl marks, scratches, or oxidation, removing the ceramic coating is crucial for effective paint correction, paving the way for polishing and restoring the paint to its original condition. Change of Coating If you plan to switch to a different ceramic coating brand or type, you must first remove the existing one. Otherwise, the resulting reaction can compromise the performance and durability of the coating. Surface Imperfections Ceramic coatings may develop imperfections such as water spots, hazing, or unevenness. Removing the existing coating creates a blank canvas to address these issues and achieve a flawless finish. Preparation for Other Treatments For optimal adhesion and performance of new treatments, it's important to remove the ceramic layer before applying paint protection film (PPF), vinyl wraps, or other coatings. End of Lifespan Ceramic coating lifespan is limited and they require removal before reapplication. Change of Ownership If you're planning to sell your vehicle, removing the ceramic coating is highly recommended. This will give the car a fresh, clean surface and could potentially increase its resale value. How to Remove Ceramic Coating (the HOW) Knowing how to remove ceramic coating is extremely important. Even the most robust ceramic coatings can wear out over time, losing their protective properties. To maintain optimal paint protection for your vehicle, it's necessary to renew the coating regularly by removing the existing one. It is essential to remove ceramic coating from your vehicle's paint on time to avoid several issues that can undermine the purpose of this protective layer. Ceramic coatings are meant to offer long-lasting protection, but they are not immune to the effects of time and environmental factors. The process of removing ceramic coating usually involves using specific chemicals or abrasive methods to break down and lift the old coating from the paint surface. How to Remove Ceramic Coating from Windshield Removing ceramic coating from a windshield can be a time-consuming and delicate process. To start, make sure to use a glass polish specifically designed for this purpose. Begin by cleaning the windshield thoroughly to eliminate any dirt or debris. Then, using a microfiber applicator pad, apply the glass polish with moderate pressure and work in small, circular motions. Once you have completed the car polishing, use a clean microfiber cloth to wipe off any residue. Repeat the process as necessary until all of the ceramic coating has been removed. Finally, use a glass cleaner to finish and achieve a crystal-clear result. Once the coating is removed, the glass surface is ready to be recoated again (prep the glass surface first, though)! How to Remove Wax Before Ceramic Coating To ensure the effectiveness of ceramic coating, it's essential to first remove any existing wax or sealant. You can use a pre-coating surface preparation product or an isopropyl alcohol solution to dissolve and lift the wax from the surface. Apply the solution onto a clean microfiber cloth and gently rub it onto the surface until all traces of wax are removed. Once done, rinse and dry the surface thoroughly before applying the ceramic coating to achieve the best results. Polishing/Compounding (simplified step-by-step process) Polishing or compounding involves using a specialized machine polisher, appropriate pads (wool of foam), and compounds. Here is a simplified step-by-step process: Clean the vehicle thoroughly to remove loose dirt. Attach a cutting or polishing pad to the machine polisher. Apply a suitable compound to the pad. Work in small sections, applying gentle pressure, and move the polisher in overlapping passes. Continue until you achieve the desired level of ceramic coating removal. Wipe off any residue with a clean microfiber cloth. Inspect the surface and repeat if necessary. Keep in mind that if you're opting for foam pads, you're using the appropriate colour. Foam pads are usually color-marked to show their cutting power (how aggressive they are). While colors can differ between manufacturers, most of them use the same colors. So, a yellow/orange foam pad should do the trick. Clay Bar Clay bar technique is a gentle and non-abrasive way to eliminate contaminants from your car's surface, and it can also help remove ceramic coating to some extent. First, lubricate the surface with a clay lubricant or a diluted detailing spray. Then, using light pressure, glide the clay bar over the surface, feeling for any rough spots caused by the coating. Keep going until the surface feels smooth. Finally, rinse and dry the area before reapplying the ceramic coating. Chemical Removers Chemical removers for ceramic coating can be effective, but it's important to handle them with care. Before applying the remover to the affected area, test it on a small and hidden portion to ensure there are no adverse reactions. If it's safe to proceed, follow the product's instructions by allowing it to dwell for a specified time, agitating it if necessary, and then wiping or rinsing it off. Always exercise caution while using these chemicals and follow the safety guidelines to avoid any mishaps. 5 Signs of Damaged or Worn-Out Ceramic Coating (the WHEN) There are several ways that are definite telltales of whether your ceramic coating is damaged or worn out. If you know how to recognize them and react on time, you won’t have to worry about the issues that damaged ceramic coating can cause. 1. Loss of Hydrophobic Properties Ceramic coatings are known for their hydrophobic properties that cause water to bead up and roll off the surface. However, as the coating starts to degrade, you may observe that this effect reduces, and water no longer beads as before. This decrease in hydrophobicity indicates that the coating's self-cleaning and water-repelling capabilities are weakening. 2. Fading or Discoloration Over time, exposure to the elements and UV rays can cause ceramic coatings to fade or change color. This means that the once glossy and crystal-clear coating may become hazy, dull, or discolored, which is a clear indication that the coating is deteriorating. As a result, it may no longer provide the same level of protection or visual appeal as before. 3. Increased Vulnerability to Scratches Ceramic coatings are a protective layer designed to add hardness to your vehicle's paint job, which helps resist minor scratches. Over time, however, the coating wears down, and your car's paint becomes more prone to fine scratches and swirl marks. If you start to observe an increase in small scratches on your vehicle's surface, it may be time to address the deteriorating coating. 4. Staining If your ceramic-coated car is often exposed to contaminants like bird droppings or tree sap, it may develop challenging stains that are difficult to clean. This indicates a decrease in the coating's protective capabilities. 5. Surface Roughness When ceramic coatings begin to break down, they can leave behind a rough or gritty texture on the paint surface. This can be felt when you run your fingers over the paint. Consequences of Delaying Ceramic Coating Removal When ceramic coatings are left on a vehicle's surface for too long without proper maintenance or removal, a series of negative consequences may occur. Initially, ceramic coating provides remarkable protection against environmental contaminants, UV rays, and minor scratches. However, as time goes by, its performance degrades, leading to issues that compromise the vehicle's appearance and protection. One of the most noticeable consequences of delaying ceramic coating removal is the loss of hydrophobic properties. Ceramic coatings are renowned for creating a hydrophobic surface that causes water to bead and roll off. This not only enhances the vehicle's appearance but also makes it easier to clean. As ceramic coatings age, their hydrophobic properties diminish, resulting in water spots and reduced self-cleaning abilities. The surface may become more susceptible to water staining and mineral deposits, which can be challenging to remove. Another clear sign of a neglected ceramic coating is fading or discoloration. Over time, exposure to sunlight and environmental pollutants can cause the coating to lose its original clarity and shine. What once was a glossy, reflective finish may turn hazy or dull. Fading or discoloration can make the vehicle look less appealing and diminish its resale value. This issue is particularly prevalent in coatings that lack UV protection or when maintenance procedures are neglected. Furthermore, aged ceramic coatings are more vulnerable to scratches. While these coatings are designed to resist minor scratches and swirl marks, they are not impervious to all forms of abrasion. Over time, especially if the coating is not correctly maintained, it can become less resilient. This means that the vehicle's surface may become more susceptible to surface imperfections and scratches, which can be difficult to repair without removing and reapplying the coating. Additionally, an outdated ceramic coating may exhibit uneven wear and patchiness. This occurs when certain areas of the coating have degraded more rapidly than others, creating an uneven appearance on the vehicle's surface. These patches can be unsightly and disrupt the uniformity of the finish. Another potential issue is the development of bonded contaminants. When a ceramic coating deteriorates, contaminants such as dirt, pollutants, and road grime can adhere to the surface and become deeply embedded. These contaminants can be challenging to remove through regular washing and may require more aggressive decontamination methods, potentially risking damage to the underlying paint. Lastly, as the ceramic coating ages and loses its protective properties, the underlying paint may become exposed to UV damage. Prolonged exposure to ultraviolet rays can lead to paint fading, oxidation, and a dull appearance. In extreme cases, UV damage can cause the paint to deteriorate, leading to costly repainting or refinishing. Overall, delaying the removal and renewal of a ceramic coating can lead to a range of issues, including the loss of hydrophobic properties, fading or discoloration, increased vulnerability to scratches, uneven wear, bonded contaminants, and UV damage. To maintain the benefits of ceramic coating and keep your vehicle looking its best, it's essential to adhere to a regular maintenance schedule and consider professional removal and reapplication when necessary. FAQ Why would someone want to remove ceramic coating? There are various reasons why someone might want to remove ceramic coating from their vehicle. Some of these reasons include wear and tear on the coating, the need for repairs or modifications such as repainting, switching to a different coating, or wanting aesthetic changes such as a matte finish or customization. It is essential to remove the coating correctly to address these needs effectively. How can you tell if ceramic coating is deteriorating? If you notice your ceramic coating is losing its hydrophobic properties, fading or discoloration, and becoming more susceptible to scratches, it may be deteriorating. These are indications that the coating is losing its protective abilities and may no longer be providing adequate protection to your vehicle's paint. It is crucial to monitor these changes to determine when it is time to remove and renew the ceramic coating for optimal paint protection. Can you apply new ceramic coating over an old one? Applying a new ceramic coating over an old one is possible, but it's usually better to remove the old coating first. Removing the old coating guarantees a clean and smooth surface for the new one, which results in better adhesion and optimal performance. Additionally, if the existing coating is deteriorated or damaged, leaving it in place may not provide the desired level of protection. Therefore, while it's possible to layer ceramic coatings, starting with a fresh surface is generally recommended for the best results and longevity. How long does ceramic coating typically last? The lifespan of the coating can last between two to five years, depending on the quality of the coating, maintenance, and environmental factors. If you want to ensure optimal protection for your car, it's important to use high-quality coatings and take proper care of them. Regular assessments of the coating's condition are also necessary to identify signs of deterioration. If you notice any, it's time to consider reapplying or removing and then reapplying the coating for continued protection. How to Remove Cerami Coating — Final Words In the world of car detailing and paint protection, ceramic coatings have certainly made their mark. They offer unparalleled benefits such as hydrophobic properties, high-temperature resistance, and exceptional durability. However, there comes a time when they need a refresh. Today, we've explored the vital process of removing ceramic coatings effectively. We've emphasized the necessity of removing deteriorating coatings to maintain the integrity of your car's surface. Whether it's due to wear and tear, repairs, a change in preference, or to prepare for a new coating, knowing how to remove ceramic coatings is a valuable skill. Signs of wear and tear, such as loss of hydrophobic properties, fading, or increased vulnerability to scratches, should not be ignored. Our step-by-step guide has highlighted various methods for removal, including compounding, clay bars, chemical removers, and more. Remember, the windshield and removing wax are specific areas to pay attention to during the process. While it's tempting to apply a new ceramic coating over an old one, our advice leans towards thorough removal for optimal results. Starting with a clean slate ensures the new coating adheres correctly, providing the best protection. In conclusion, ceramic coating maintenance is essential for long-lasting paint protection but knowing when and how to remove ceramic coatings is as crucial as the initial application. So, as you embark on your car detailing journey, keep these insights in mind to maintain that showroom shine. Now, we want to hear from you. What challenges have you faced with ceramic coating removal? Do you have any tips or tricks to share? How often do you refresh your coating? Share your experiences with us — info@ceramiccoatexpert.com! Cheers!
- Ceramic Coating Wheels - Should I ceramic coat my wheels?
You get yourself a new set of wheels, the first thing you'd want to do is drive to all of your favorite locations, and you even find the time to take selfies to post across your social media. Later, you drive back home, and the next morning, you want to go out, only to discover you have your fresh new and clean wheels now looking all dirty and unattractive. The only thing left to do is to visit a car wash or clean the wheels yourself. By ceramic coating wheels, you can put a stop to that annoyance, and you can also make sure that the wheels on your car continue looking nice and crisp! You don't want to be in the position of cleaning the wheels of your car every single time you go out for a ride. Now, after that dramatic intro, let's focus a little bit on the actual dirt that gets caught on your wheels while driving. Contents: Ceramic Coating For Wheels — What is that? How Long Does Ceramic Coating on Wheels Last? Can I Ceramic Coat any type of Surface? How to apply Ceramic Coating to your Wheels? Best Ceramic Coating for Wheels What are The Benefits of Ceramic Coating Wheels? Ceramic Coating For Wheels That We Recommend - GYEON Quartz Rim Coating FAQ Should you Ceramic Coat your Wheels? — Final Words Cleaning your wheels may not be a problem for you, but dirt, grime, and iron dust are a problem for the wheels themselves. Exposure to all sorts of contaminants on a daily basis can build up damage on them, and you don't want your brand-new wheels scratched, not to mention damaged. And even if the damage is sometimes only minuscule, the damage is bound to build up over time. The bottom part of your car, along with the front of the car, is the part that absorbs up to 90% of the damage that gets on the car over its lifetime. Wheels are part of that, and if you can eliminate or, even better, prevent some of that damage - you'll definitely get a greater deal than you'd otherwise get, and you'll end up with a better-looking car. The question you're probably asking now is, "How can I protect my wheels?". If this is the question you're asking, then our answer is -"You can protect your wheels with Ceramic Coating." Ceramic Coating For Wheels — What is that? You might've heard the term "ceramic coating" before, but you didn't know much about it, or you don't understand how it works. Here is a brief but detailed explanation to help you understand all about ceramic coating and why you should coat your wheels with ceramic. If you want a longer explanation of what ceramic coating is, what it does, or how it does it - you can read this article here. To protect the exterior of a car from paint damage, a sacrificial layer is required. A layer that will absorb or help prevent the damage that would otherwise occur to the paintwork of your vehicle. So basically, it's like galvanization for the paint of your car. Ceramic Coating, also sometimes referred to as nano-coating, is a chemical polymer solution that hardens on top of your car's paint and forms a hydrophobic layer of protection. The application of a ceramic coating is usually made by hand. People with genuine interests in automobiles and car experts all over the world argue whether the ceramic coating is better or worse than paint protection film, wax, or a car sealant. You can check our article, where we compare car wax, car sealants, ceramic coating, and PPF and see the advantages and disadvantages of each one of them. If your car develops a fault or requires maintenance, take it to a professional mechanic instead of trying to repair the damage yourself. The same scenario works when applying a ceramic coating. If you have zero experience or little knowledge about applying the ceramic coating correctly, you may get unsatisfactory results. It is best to get a professional ceramic coating job. So, to summarize, ceramic coating is a layer of chemical polymer that is applied to the exterior of your car or your wheels, or even sometimes the plastic trim of your car, and it blends seamlessly with the original paint. With the hydrophobic layer created by the ceramic coating, the exterior of your car or wheels is protected from harms like ultraviolet rays, oxidation, peeling, or discoloration. How Long Does Ceramic Coating on Wheels Last? The answer is yes. Ceramic coating lasts, but for how long? Ceramic coatings will last up to anywhere from 2 to 5 years if you take good care of your car. Good care, or more precisely, good maintenance of your car, is when you clean your car regularly. The ceramic coating prevents harm to the paint job of your car, but the ceramic coating itself can get scratched. Can I Ceramic Coat any type of Wheel Surface? As for wheel surface finishes, some examples of finishes you can apply ceramic coating to are polished wheels, glossy wheels, matte, satin-textured, powder-coated, machine finish, and, of course, any painted surfaces. From all the finishes mentioned, only a matte finish won't look as glossy after applying a ceramic coating. When a ceramic coating is applied correctly to a matte finish, it will look clean and sharp. How to Ceramic Coat Wheels? When your wheels are new, that's usually the best time to apply Ceramic Coating because they still haven't been damaged in any way, and you want them to look like new for as long as possible. But even if they are new or dirty, you'll still need to prepare the surface of the wheels. No elements of dirt or grease should be present because they will both affect the bonding process in a negative way. New cars often have wax, or a sealant applied to them to make them pop and look more attractive. The next thing you do after cleaning your wheels is to apply the ceramic coating to the surface of the wheels using a microfiber or a suede applicator. As we've mentioned earlier, the polymer, once it has been cured, will bond with the paint or finish of your wheels and will not wash off. If you want to learn how to apply a ceramic coating on a car then see Best tools when working with ceramic coatings where you'll get a fully detailed professional 8-step guide on ceramic coating application, the tools you should use, and an explanation of how to use them. Best Ceramic Coating for Wheels When choosing a ceramic coating for your wheels, you really do not have to look for a specific one. There are specific ceramic coatings that are designed specifically for wheel applications, such as GYEON Quartz Rim Coating or CARPRO CQUARTZ DLUX Wheel and Trim Coat, but unless the coating instructions state otherwise - you can use any ceramic coating on your wheels. The reason why there are specialized ceramic coatings for wheels is that they are designed to endure high temperatures that occur when breaking hard or often. This is why it is recommended that if you are coating wheels or the engine of the car - you go for these types of ceramic coatings. In our experience, any good quality ceramic coating will last you roughly the same when used on wheels, unless you own a racing car, offroader, or dragster, or something like that. You can check out our Top List of best Ceramic Coatings that we've tested and reviewed to find one that suits you the best. What are The Benefits of Ceramic Coating Wheels? If you've read this far, you must have come across some benefits of ceramic coating your wheels. We'll just highlight them so you have them all in one place: The most noticeable benefit of a ceramic coating is the glossy appearance it gives your wheels. The other thing you'll notice just as quickly is the hydrophobic properties that the ceramic coating provides. If your wheels have a lot of spokes like that of a bicycle, they'll be a nightmare to clean, but ceramic coating helps you clean them more easily. Ceramic coating doesn't mean you have to stop cleaning your wheels; it only makes cleaning your wheels a lot easier and less stressful. Wheels without a ceramic coat require a whole lot of effort to get clean, and you will need more products for cleaning compared to when your wheels are not protected. Ceramic coating makes sure your wheels don't get dirty as often. Your wheels getting dirty is unavoidable, but when they are ceramic coated, specks of dirt, grime, iron dust, and debris can't stick to them as easily. This is simply because the ceramic coating creates a smooth surface. The largest benefit you enjoy with ceramic coating your wheels is that your wheels' best features are brought out. Ceramic coating brings out the best features of your wheels by providing a smooth and shining texture. The wheels of your car will look brand new for years to come. You will also protect your car's wheels from oxidation, salt corrosion, and ultraviolet rays. Ceramic Coating For Wheels That We Recommend - GYEON Quartz Rim Coating As mentioned earlier (alongside CARPRO Wheel Coat), we use GYEON RIM Ceramic Coating for our wheel ceramic coating jobs. We've tried different product over the years, but we are most happy with the results this one provides. The GYEON Quartz Rim Coating stands out with its professional-grade results that are surprisingly easy to achieve. The thick formulation ensures that a single layer suffices, making it very user-friendly. Its standout feature is the temperature resistance, which exceeds 1400ºF, ensuring the coating holds up even in the most demanding conditions near engines and exhausts. Another aspect we admired was its high self-cleaning ability. Wheels with intricate patterns can be a hassle to keep clean, but this coating significantly reduces the effort needed. It's also versatile, safe for all finishes, including wet painted, powder-coated, anodized, or polished rims. We applied it in sections due to its fast-drying nature and recommend keeping a minimum of 4 hours between layers if you decide to add more for increased durability. At 30 milliliters, the volume is ample for multiple applications or vehicles, making it a cost-effective option. It's a product that lives up to its promises and then some, a definite recommendation from the CCE Team. Buy it on Amazon via our affiliate link (to help us grow the website): https://amzn.to/48d1HB4 FAQ Is ceramic coating good for wheels? Yes, ceramic coating is beneficial for wheels. It adds a protective layer that can enhance the appearance, make cleaning easier, and protect the wheels from various elements like dirt, grime, and UV rays, ultimately preserving their condition for a longer period. Can you put ceramic coating on tires? Ceramic coating is generally not recommended for tires because they are made of rubber and constantly flexing, which isn't compatible with the rigid nature of ceramic coatings. Instead, specialized tire protectants and dressings are better suited for tires. Does ceramic coating stop brake dust? Ceramic coating doesn't stop brake dust from forming, but it can make cleaning it off much easier. The coating creates a smooth, hydrophobic surface that prevents brake dust and other contaminants from adhering strongly to the wheels, making them simpler to clean and maintain. Is it better to apply ceramic coating to new or old wheels? It's best to apply ceramic coating when the wheels are new to protect them from the start. However, older wheels can also be coated after thorough cleaning and surface preparation to enhance their appearance and protect them from further damage. Should you Ceramic Coat your Wheels? — Final Words If you read all that detailed information about ceramic coating and why it works for your car wheels but you still can't make up your mind to decide if it's worth it - We'll just say it is something you should definitely consider doing. Whether your car is a daily driver or a show car, yes, you should ceramic coat your wheels. It will only benefit your car in a good way.
- Water spots on ceramic coating - How to deal with them?
Water spots on ceramic coating can be a nightmare to deal with if they are left unchecked for a long time. They are the Achilles' Heel of ceramic coatings if you're not prepared for them. Because of the water-beading effect that ceramic coatings provide, water beads that stay on the car and are left to dry leave mineral deposits that can sometimes etch into the coating itself and ruin it. This guide will teach you what water spots are, what type of water spots you can run into, and how to deal with them, regardless of whether you have a ceramic coating on your car or not. Suppose you leave water spots on your car without attending to them for too long. They will etch the clearcoat and get deeper into it. If you have a ceramic coating, you might run into the same issue. Contents: What are water spots on a car? What type of water spots are there? How to remove water spots? How to deal with stubborn water spots? Using chemicals specially designed for water spot removal Using 100% undiluted white vinegar to remove water spots Using a clay bar to remove water spots Using machine polishing to remove water spots FAQ Water spots on ceramic coating - Final thoughts So, to avoid future headaches, make sure there are no water beads on the surface of your car. If you have a ceramic coating on the paint installed, then you can even use something like a leafblower to easily remove all the water beads from the car's surface. What are water spots on a car? Unless we are talking about distilled water, all other water has minerals in them in some trace amount. Once the liquid dries, the minerals are what is left. If that process happens on the paint of your car, you are left with what we call water spots. What they really are is very small rocks that are stuck in the clear coat layer of the car's paint. If you have a ceramic coating, those minerals get stuck on the coating itself. And while in most cases, water spots will not damage the coating itself, they still reduce its efficiency while they are left untreated. What type of water spots are there? There are two types of water spots that we have in the car detailing industry: mild or soft water spots stubborn or hard water spots The mild water spots can usually be removed with little effort using water spot-removing chemicals and a microfiber towel, while the stubborn ones are usually a headache to deal with and often require a more aggressive approach to remove. The mineral amount in water is usually measured on a scale from Distilled Water which has no minerals in it, and Hard Water, which has a lot of minerals in it. Depending on the area you live in, the plumbing, the water source, etc. Water that comes from an underground well will usually be heavier than the water that you use in your kitchen. But again, even that can be different based on where you live. That is why you see more people with kidney stones in some places of the world and fewer in other parts. Kidney stones are basically the same thing - piled-up mineral deposits that come from the water that we drink. How to remove water spots? What we would suggest is using a 50-50 mix of water and white vinegar. If you ever had a calcium-based rock dipped in white vinegar, you would see it start bubbling immediately. That is the acid from the vinegar starting to dissolve it. This is basically what happens on the car's paint as well, just on a smaller scale, of course. You want the vinegar diluted with water to reduce its pH value. Using vinegar and water is an inexpensive way of dealing with water spots, and we highly suggest you use that method instead of paying high dollars for products that are mostly the same thing. Vinegar does have a pretty strong odor, so keep that in mind when working indoors. It is not toxic, but a well-ventilated area goes a long way. Mix the vinegar and water into a spray bottle, shake it well, and then spray it on the area where you have water spots on. Leave it for about 30 seconds to 1 minute so that the acid can work its magic. After that, rinse it with water and dry the area well. Just by using this, you should be able to deal with most of the water spots that you might encounter. Those that you can't deal with this way are stubborn water spots that came from hard water or were simply left unchecked, and they had time to build up. WARNING: Do not try removing water spots on a hot day or in direct sunlight. Because the liquid that is used for the process will evaporate before it has a chance to dissolve those minerals, it will also likely leave stains if it evaporates before you have a chance to rinse it off with water. How to deal with stubborn water spots? You can try using the above method again. However, if the water spots are still there, then you will need to get creative. Then you can either: use a chemical specially designed for water spot removal use 100 undiluted white vinegar use a clay bar use machine polishing Using chemicals specially designed for water spot removal This method will cost you some money. It is not that expensive, but if you are not careful, this can add up. What we use in our shop is Optimum 22394 MDA. MDA stands for Mineral Deposit Remover. The product comes in a 1-gallon container. It is a brown-pinkish gel. And it is applied via a microfiber towel onto the contaminated area. You work the area using horizontal and vertical movements for about 30 seconds. Then, rinse the gel off with water and dry the area with a clean and dry microfiber towel. The area should be water spot free after that. You can repeat the process if the water spots are still visible. If the water spots have penetrated into the clear coat, this method will not be effective. Using 100% undiluted white vinegar to remove water spots This is the cheaper and more aggressive method, so take some caution. Vinegar is quite acidic at a pH value of 2.5. Water, for instance, has a pH value of 7. That number can range from 6.5 to 8.5 depending on what water we are talking about, but still, the difference is huge. In another article on our site, you can read more about pH values and why they are important when it comes to your car's paint and the ceramic coating you have installed. See 'Why ph neutral car shampoo?'. This type of acid can damage the paint of your vehicle and is generally not recommended. If you have a ceramic coating, the paint will be undamaged, but the ceramic coating, depending on the quality, might lose some of its effectiveness. With this method, you want to use latex gloves so the acid doesn't affect your skin. You might not see any damage after one use and might be thinking that you don't need gloves. But after a couple of the same uses, the damage would start piling up, and you'd see and feel the difference. Always wear gloves when working with stronger chemicals. The process is still the same. Spray it onto the hard water spots, wait for about 30 seconds to a minute, and then proceed to rinse and dry. Hopefully, this took care of your problem. Using a clay bar to remove water spots If you haven't been able to remove the water spots by using the above methods, then you might be starting to see why water spots can be such a nuisance to deal with. A ceramic coating will likely be removed by using a clay bar. Nevertheless, use lubrication that came with the product, or if it didn't, then use soapy water in a spray bottle. An automotive clay bar is an abrasive, and it will cut more if proper lubrication is not applied. If you do not have a ceramic coating and are using a clay bar on your car, make sure to use a paint measuring gauge to see if there is enough clear coat left on the car so you know it is safe to use without damaging the paint. Almost all water spots will be removed by using this method. Reapply the ceramic coating after that. Follow our 8-step guide on how to apply a ceramic coating, check the clay baring step, and go from there. If, however, you either do not have a clay bar or the water spots still persist. Then, you probably have a headache and are to proceed with the final step. Using machine polishing to remove water spots This step is straightforward but also very time-consuming. It can be expensive if you do not have the tools that are required. Check the tools in our recommended products section. If you are new to car detailing and paint correction then you can also check our guide on how to perform paint correction on a car by machine polishing to get an idea of what you will need and how to do it. FAQ Should you be concerned about water spots on ceramic coating? Yes, water spots can etch into the coating and reduce its effectiveness if left untreated. Does water ruin ceramic coating? Water itself doesn't ruin ceramic coating, but the minerals left behind from water spots can damage the coating over time. What happens if water gets on ceramic coating? Water beads up due to the coating's hydrophobic properties, but if left to dry, it can leave mineral deposits known as water spots. Water spots on ceramic coating - Final thoughts After this, the water spots will be removed. The moral of this story is - always get rid of the water that has been left on your car as soon as possible before it dries out. Especially during the summer, because the days are hotter and the water evaporates much faster. Any car is vulnerable when it comes to water spots, but those that have a ceramic coating on them are even more so because of the water beads that coating wasn't able to push off the surface of the car - especially on very large flat surfaces such as the hood or the roof. It all depends on the shape and the design of the car you're driving. The best way of dealing with water spots is to prevent them from happening in the first place. Cheers!
- Review: Adams Graphene Coating (Advanced)
Ok, so today, on our hands, we have Adams Advanced Graphene Ceramic Coating. This is an upgraded version of Adam's Graphene Ceramic Coating and is, as they claim, their most advanced coating product yet. So, is it worth getting the Advanced formula over the regular one? Well, that is very easy - they cost the same. And with Adams Graphene Coating, you get more bang for your buck! So our suggestion is that you go for the Advanced formula every time over the standard one. The only reason we would ever go for the standard one is if the advanced version was out of stock and we were in a hurry for some reason. Contents: Why is this graphene coating called 'Advanced'? Are graphene coatings a hoax? Adam's Advanced Graphene Ceramic Coating Specification How to apply Adam's Advanced Graphene Ceramic Coating? What are the benefits of having Adam's Advanced Graphene Ceramic Coating on your car? How many layers of Adam's Advanced Graphene Ceramic Coating should you apply? FAQ Final thoughts on Adam's Advanced Graphene Ceramic Coating We use Adam's products all the time, and we have a high opinion of that detailing company, so we naturally have high expectations. We have a review article for Adam’s UV Graphene Ceramic Spray Coating. It is not a true ceramic coating but a ceramic coating spray instead. A ceramic spray coating is closer to a sealant than it is to a ceramic coating, but it has SiO2 technology embedded into it, and it also has graphene in it, as well. You can check the review, but to summarize - it performed really well, and we are glad that we gave it a go! This product got us quite a number of recommendations, so we are very excited to test this one out and see it in action in real-world conditions. Just to clarify - we are not sponsored by Adam's or any other manufacturer of Paint Protection products, and we will test and review the product as it is in real-world conditions. We will follow the manufacturer's instructions during the application process, and we will prepare the surface to ensure the best finish and best adhesion possible. We are leaving an affiliate link to all our review products, but in case the product turns out to be of low quality or not as all as advertised, we leave a warning to all our readers, and the quality of the product will always be reflected in the grade we assign to it at the end of every review. So if you do not want to sit through all of this text, you can scroll down to the Average Grade and read our Final Thoughts to get a general idea of what the product is all about. Let's see what we got, and then let's dive into everything that we need to know! Adams Advanced Graphene Ceramic Coating Get your Adams Advanced Graphene Ceramic Coating on Amazon here: https://amzn.to/3UlYMzG Why is this graphene coating called 'Advanced'? The main difference between Adam's Graphene Coating and Adam's Advanced Graphene Coating is durability or longevity. The standard formula gives you 7+ years of durability, while the advanced formula goes a step further and gives you an impressive 9+ years of longevity. You can see that in this article as well, where we check for the longevity of various popular ceramic coatings on the market. If you know anything about ceramic coatings, then you know that this number is simply crazy! Crazy good, or just crazy - we will find out! The other difference is that in the Advanced formula, you get 50% more of the raw active ingredient, or as we like to say, "more solids". With this one, you get around 45% of solids, while the regular one gives only 30%. So, to sum it up, with the Advanced version, you get more durability and longevity. The solids are, in the end, what gives the coating more durability once it cures. We also feel that we need to address the issue of graphene coating, so here we go: Are graphene coatings a hoax? Graphene coatings, since they came out, were called many things, but mostly it was 'snake oil', or 'scam', etc. We would definitely not call them that. We would, however, emphasize that 'graphene' when it comes to ceramic coatings is a bit of a buzzword. You can always check in more detail our article about whether graphene coatings are a scam or not, but the answer is never one-dimensional. It is complicated. In short, all graphene coatings are ceramic coatings. They have a ceramic base, but the formula is "upgraded" using graphene or graphene oxide. Does the graphene actually improve the coating itself, or would the coating be as effective without the graphene in it? That is hard to say. There is very little evidence that graphene does anything for the coating, but it also doesn't hurt it. So, 'graphene' might just be a marketing ploy to increase the visibility of the product or to increase sales. Whatever the reason - this is what people usually refer to when they say that graphene coatings are a scam. Because, in reality, there are some amazing graphene coatings out there. We've used them, and we like them a lot! It is also probably worth mentioning that there are some pretty bad graphene coatings on the market, so just be careful! Let's check out Adam's Advanced Graphene Ceramic Coating and see what it offers! Specification: Protection from weather, chemicals, and UV rays Rejects dirt, and other deposits 10H hardness 7 to 9+ years of protection, depending on maintenance Infused with patent-pending Ceramic Glow Technology Ultra high gloss Enhances color Extremely hydrophobic Extreme slickness Less prone to water spotting Made in the United States Now let's go through this list to see what this product offers and give you our experiences with Adams Advanced Graphene Ceramic Coating. Adam's Graphene Coating comes in a 2 fl oz or 60 ml glass bottle. If you see a ceramic coating in a glass bottle, that is a good thing. What seems uncommon is that 60ml packaging, since most other ceramic coatings come in a 30ml bottle instead. And you can usually buy a bigger package of those coatings, and those come in a 50ml bottle. So, the 60ml stands out straight away. This, however, doesn't mean that you get much more product for your money than you usually would, because contrary to regular ceramic coating, you use more product in the installation process. A 60ml bottle will be enough to cover a whole large-sized truck, including the wheels. As with almost all graphene coatings, the liquid in the bottle is black. This, however, will not affect the color of the car. It will actually enrich the way a color looks. So it is completely safe to use a graphene coating on a white-colored car. This graphene ceramic coating promises a 10H hardness level. You can learn all about what 9H and 10H mean when it comes to ceramic coatings here. 10H is good since most other ceramic coatings have a hardness rating of 9H. It is nothing game-changing, but it will save you a few scratches along the way. Let us talk about the 7 to 9+ years of durability. That is a lot! Most ceramic coatings, that aren't professional grade give you 2-5 years of durability. And that heavily depends on the level of maintenance that you put into your car. So having even 7 years is amazing, but 9+ years is just too much ( in a good way ). If we get even half of that, we'd be thrilled! Their Glow Technology is very unique, and we haven't seen something similar on other ceramic coatings. Way to go Adam's! What it does is once you apply the coating and shine UV light towards it, it'll glow bright blue. This way, you can easily keep track of which areas you've covered and which you still have to do. It is a handy feature, we cannot lie, but is it really necessary? Well, no, not really. We would say that this is a great plus, and if you feel like you need extra guidance - it is there. The only thing that we can think of where it would shine ( no pun intended ) is if a novice is applying the ceramic coating for the first time. They can then use this feature to check if they've ceramic-coated the whole panel that they're currently working on or to see if they perhaps missed a spot. Ultra-high gloss is a staple in the ceramic coating industry. While there are some ceramic coatings that work well with a matte or a sating finish, ceramic coatings usually give a car an almost candy-like gloss—some more than others. Adam's Graphene is definitely in the upper echelon of this category. The gloss it gives is amazing. Your car will look as if it was freshly polished and better for years. Does Adam's Advanced Graphene Coating enhance the color of the car? The answer is yes. But it depends on the base color of your car. A red car will not look the same, for example, as a lime orange car after it is coated. The best description would be that the color would kind of pop! We found that this coating has great hydrophobic properties, but on flatter surfaces, such as the hood or the roof, we were often met with countless small water beads. A simple drive around the block, a leaf blower, or an air compressor solved that issue in seconds. But it's something to take note of because all water beads that are left to evaporate on the surface of the car are potential water spots. To solve the issue of water spots, graphene coatings promise a superior sliding angle, that sheets the water off the vehicle in seconds, leaving no water beads behind it. If any water beads are left, it is a minuscule number to what we usually encounter. We have seen some coatings do that, but Adam's Advanced Graphene Coating is not one of them. It is stated that this coating provides a superior sliding angle of 110-118 degrees which is at the top in the car detailing industry, but we, unfortunately, haven't seen those numbers in action. It is good and consistent, just not the best. And the best thing about it - It is made in the USA. That one has to count for something! How to apply Adam's Advanced Graphene Ceramic Coating? First, as always - read the instructions! When ceramic coating a car, you want your car clean and rid of contaminants that might be embedded in the paint's clear coat. If you have no idea what we are talking about, you can click here to learn how to properly prepare the paint of your car for ceramic coating and other forms of paint protection. The car is now fully prepared to be ceramic coated, meaning there is nothing left on the car's paint that might interfere with the bonding process of the coating with the paint. This means the car's surface is completely clean and dry, and all oils, grease, or polishing residue has been properly removed. With all coatings, but especially graphene coatings, it is recommended to shake the bottle well before each usage. This way, you ensure no deposits are left on the bottom of the container that might have settled if the product wasn't used for a longer time period. Map the car into smaller working areas. The best and easiest approach is to work panel-by-panel. This way, you always know the area you are working on, and you also know what is left. A great thing about Adam's Advanced Graphene Coating is that it can be applied to all surfaces of the car. So glass, any plastic trim, or even wheels are on the menu. Just do not try coating rusty steelies. This is super handy because you do not have to be careful. You just start applying the coating to the whole car - Easy! Put on some latex (disposable) gloves! Two reasons why: You do not want the oils from your hands to contaminate the surface of the car. You do not want the coating hardening on your skin. Take your applicator block that came with the product. A neat thing about them is that they are already prewrapped with a piece of suede cloth. What is also beneficial is that the suede will not absorb so much of the product, but will instead keep it on the surface. This ensures maximum efficiency when covering the vehicle. If you, for some reason, don't have Adam's applicator block, then use a regular applicator block with a suede or microfiber cloth wrapped around it. Shake the coating bottle, open it, and put a decent amount of liquid along the whole length of the cloth. You want it saturated. It will look black, and that is a common occurrence with graphene coatings. Don't worry; that will not darken the color of your car. Make sure to put the cap back on once you've applied the product onto the applicator block! Even though the bottleneck was designed to not let air in, some still might come in, and that will automatically start the curing process. You don't want any crystalization on the top or for it to cure. Once the liquid inside the bottle cures, it will be like having a piece of glass inside the bottle. Then, proceed to apply the coating onto the car's surface in a cross-hatch pattern. Make sure you cover the whole panel. As soon as the graphene coating touches the car, you will see the color change immediately, looking rich. Also, as opposed to regular ceramic coatings, where you sometimes have to wait a minute for it to start rainbowing, with this product, you'll notice it starting to rainbow almost immediately. If you notice the application starting to get dry a little bit, then just add more product onto the applicator block. Use the same strategy to cover the whole car. Once the rainbowing effect starts to dissipate, that is your cue to start leveling the coating and then buffing it. You need 2 suede or microfiber towels for this. One is used to level the coating, ensuring no high spots are left, and any excess is removed. The other towel will then be used to buff the coating and pull the surface oils with it. We've noticed that the coating feels quite tacky and grabby and is a bit harder to buff off than other coatings. This is normal with graphene coatings. What are the benefits of having Adam's Advanced Graphene Ceramic Coating on your car? Your car will be much easier to clean and maintain. It will get dirty much less. It will slow the oxidation on all the surfaces of your car. This means the color of your car will not fade as fast, the clearcoat will not deteriorate and start cracking and peeling as fast. The plastic trim will not become dull and faded as fast as it normally would. The headlights of your car will not become yellow as fast. The benefits are amazing for the exterior looks, longevity, and value of your vehicle. How many layers of Adam's Advanced Graphene Ceramic Coating should you apply? Just the one. Stacking multiple layers of this product won't make it last any longer. One properly applied layer of this graphene coating will last you 9+ years. Our verdict on this product: product lifetime when applied: A+ resistance to elements: A resistance to damage: A resistance to chemicals: A application difficulty: C hydrophobic properties: B gloss / shine: A Average grade: A Cost: 56.52$ / 1 fl oz 1.88$ / 1 ml FAQ How long does Adam's graphene coating last? Adam's Advanced Graphene Ceramic Coating can last up to 9+ years with proper maintenance, offering long-term protection and durability. Is graphene coating good quality? Yes, graphene coating is generally high quality, providing enhanced durability, hydrophobic properties, and UV protection compared to some traditional coatings. It's known for its high gloss finish and extended longevity. What are the disadvantages of graphene coating? The disadvantages include a higher cost, the complexity of application (best done by professionals or experienced individuals), and potential inconsistency in quality among different brands. It may also be harder to remove or repair than other coatings. Who makes graphene coating? Various manufacturers produce graphene coating, with Adam's Polishes being one of the well-known brands in the industry. Other notable companies also offer graphene products, each with their unique formulations. Final thoughts on Adams Graphene Coating Is this the best coating we've used to this day? That is not an easy question to answer. And that answer holds its own weight considering all the ceramic and graphene coatings we've tried over the years. But, it is the first coating to receive an average grade of A. And that is amazing! Adam's has definitely created something that we can recommend without any thought. It is hard to confirm whether it will last the 9+ years, but during the testing, we gave it a beating with fast driving through rough terrain and smashed all kinds of chemicals on it. It lost none of its properties and remained consistent throughout the full two weeks. You can learn all about how we at Ceramic Coat Expert test and review products in this article. Even though you'll pay a bit more for this coating, you will have your money well spent since it will keep your car looking fresh and protected for years to come. And that alone is worth your money! Compared to other graphene coatings in their lineup, it is simply superior: Considering both the regular and the advanced versions have almost the same price point ( depending on when and where you buy them ), there is absolutely no reason why you should not go with the Advanced formula. Adam's - great job on creating an amazing product! It has some flaws, but in some categories, this is a step up and a milestone for other car coatings to reach. Get your Adams Advanced Graphene Ceramic Coating on Amazon here: https://amzn.to/3UlYMzG Cheers!